Booking
Individual
Booking Card for the customers arriving pax based and Group Booking Card
for the ones arriving group based is opened in the Booking Module. Check
- In with Booking is executed on the Booking List screen. Room allocation
can be made and removed. Furthermore, customers who made their bookings
on the Internet, can be followed up in this section. When the booking
becomes definite, it can be imported to the booking list and later Check
- In operations can be executed.
Individual
Booking
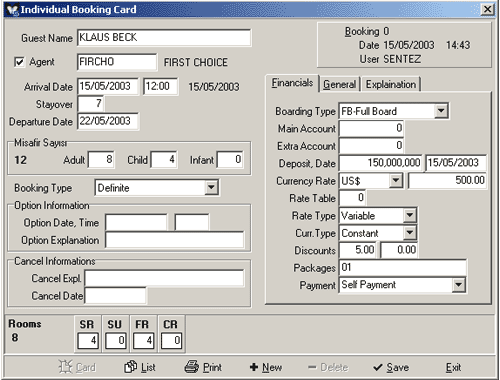
Figure 1 Individual Booking Card
First name and last name of the guest, who made
the booking, is entered into the Name field. In order to display the guest
name list, either press on the F7 key or click on the List button. Guest
Card Filter is displayed. Guest List is displayed after the filter. Guest
name is selected here by clicking on the select button, and is transferred
into the Name field, which is on the Individual Booking Card screen. If
the Guest Card was not defined beforehand, press on the F4 key or click
on the Card button to open a new Guest Card. Alternatively, you can enter
the name and surname of the new guest into the Name field and press ENTER.
A question is displayed on the screen as Name could not be found.
Create new Card? If the answer to this question is YES,
the Guest Card is opened. Required information is entered into the Guest
Card and saved. Information that was entered during the booking is transferred
into the Check-In Card after the Check In operation.
Agent concerning the person is selected and agent default
is appointed in the Agent field. If the Agent button is not marked,
the program will not allow to make any selections about the agent. If
the Agent button is marked, agent select is allowed.
Operation date and hour is displayed automatically on the Arrival
Date field. If necessary, date info can be changed.
Date calculated by subtracting the Cancel Deadline period from the Arrival
Date is displayed automatically in the Cut Off field and cannot
be changed. Required notice about the certainty of the booking should
be given to the hotel authorities until the Cut Off date by the
Customer or the Agent.
Number of days that the guest will accommodate is entered into
the Overnight field. The value entered into this field automatically
affects the Departure Date.
Departure
date of the guest is automatically displayed on the Departure Date
field according to the number of days entered into the Overnight field.
If requested, departure date can be written into this field without entering
the overnight value. Thus, overnight value is calculated automatically
by the program and displayed in the relevant field. Numbers of guests
as Adult, Child and Infant are entered into the Guest No
field. Booking type as Definite, Optional, Waiting List, Cancelled and
Turnaway is selected by clicking on the select button in the Booking
Type field.
When the booking type is selected as Tentative, date and hour acknowledged for the option is entered into the Option Date / Hour option of the Option Information field. Required explanation concerning the defined option is entered into the Option Explanation field.
If the booking is not selected as Tentative, the program will not allow any information entry to this field. When the booking type is selected as Cancellation, reason of the cancellation is entered into the Cancellation Explanation field. If the booking is not selected as Cancellation, the program will not allow any information entry to this field.Number of the rooms to be booked is entered into the Room No field according to the room types defined in the Sentez Delux Parameters section (For example; Single Bed (SB), French Bed (FB), Double Bed (DB), Trible Bed (TB), Suite (SU) etc.)
Individual
Booking Card Financial Info Window

Figure
2 Individual Booking Card / Financial Info
Requested boarding type is selected
in the Boarding Type field among the Boarding types (For example,
Full Boarding (FB), Half Boarding (HB), Bed & Breakfast (B&B)
etc.) defined in the SentezDelux Setup
Program / Front Office Parameters . If there is a Main Account Card
of the guest or organisation subject to booking defined beforehand, relevant
account is selected among the Account Card List displayed on the screen
by clicking on the List button in this field. If a new account
is required to open, Account Card is defined by clicking on the Card
button. If there is an extra Account Card of the guest or organisation
subject to booking defined beforehand, relevant account can be selected
from the account card list displayed by clicking on the List button
in the Extras Account field. Otherwise, Card button
is clicked to open a new Extras Account Card.
NOTE: In case that Main Account and Extras Account are not
opened, these accounts are opened automatically by the program during
the check-in.
If cash payment will be made during the booking, payment amount and deposit
payment date are entered into the Deposit, Date field.
Foreign currency type in relation to the price of the booking in
question can be selected from the list by clicking on the select window
in the F. Currency Type field. Displayed information have parameters.If
necessary other currencies could be added
If the Change Rates were entered beforehand, rate of the selected
foreign currency type at the relevant date is automatically displayed
on the F. Currency Rate field. If required, a different foreign
currency type can be entered. If the foreign currency rate of the present
date was not processed, the latest entry is displayed automatically on
this field.
Numbers of the rate tables defined in relation to the accommodations
of the guests or the organisations are entered into the Rate Table
field. In order to list the Agent Room Rate Tables defined in this field,
select the relevant rate tables from the list displayed by clicking on
the List button. If the required rate table is not in the list,
new rate table is opened by clicking on the Card button.
NOTE: If
the rate table number is not determined, price is calculated on the basis
of the agent room rate, if there is
In the Rate Type field, it is determined whether
the accommodating guest will be affected from the rate changes during
his/her accommodation by selecting one of the Fixed or Variable options.
When the Fixed option is selected, boarding rate will not be
changed during the accommodation
When the Variable option is selected, price will be affected
from the rate changes during the accommodation.
Now, lets analyse the properties of fixed and variable options with an
example: Lets assume that room rate for FIRCHO Tourism is defined.
Its validity is between 01/07/2000 - 30/07/2000. And the prices are as
follows:
01/07/2000*15/07/2000 => 60 USD15/07/2000*31/07/2000 => 90 USD.
If the fixed option is selected, room rate that was valid at the arrival
of the guest to the hotel will be valid until the guests departure. Lets
assume that the guest arrived the hotel on the 1st of July 2000. Even
if he / she will stay until the 31st of July 2000, he / she will be charged
from 60 USD per night as in the example. If the variable option is selected,
the program will calculate the price according to the room rate at the
arrival date until a new room rate is defined. By that date, the new room
rate will be valid and the price will be calculated according to the new
rate. To clarify with an example, lets assume that a guest arrived the
hotel on the 13th of July 2000. According to the room rates given above
for FIRCHO Tourism, he/she will be charged 60 USD per night for the 13th
and 14th of July 2000, and 90 USD per night by the 15th of July 2000
This function becomes active by determining whether the foreign
currency rate as fixed or variable, room rate type as variable and defining
the room rate in the determined foreign currency in the F. Currency
Type field. It is defined from the list whether the F. Currency Type
is fixed or variable.
When it is selected as fixed, the room rate will not be affected
from the rate changes during the accommodation.
When it is selected as variable, the rate changes will affect
the price. In order to do this, foreign currency rates should be processed
daily.
Discount that was defined in the agent card is entered into the first
box of the Discounts field, while the discount rate that will be
applied on this discount is entered into the second. Codes defined in
the SentezDeLux Program / Packages
List is entered into the Packages field. If the defined packages were
entered into the Booking and Check In card, they are processed into
the account automatically after the night audit.
In order to save the defined Individual Booking Card, press the F5
key or click the Save button; to print the Booking Document, click
on the Print button; and to cancel press the F6 key or click
the Delete button after displaying the relevant card on the screen.
Individual
Booking Card General Info Window

Figure
3 Individual Booking Card / General Info
Explanation
about the booking is entered into the Explanation field and is
used for information purposes.
In order to follow the nationality of the arriving persons, select the
nationality from the list in the Nationality field. It is possible
to add new nationalities or omit from the existing ones in this field.
You should pass to the Nationality Cards section in the Cards module for
this operation. After determining the required nationality code in this
field, it is saved. Nationality Card that was opened after this operation
is reflected to the required fields. Market field is used to determine
the arrival purpose of the guests to the hotel. By means of this field
in the Market cards, it can be determined who has arrived for business,
for tourism, for journey and for any other purpose. The determined info
for the required date and period can be analysed easily from the Statistics
menu of the Reports section, and from the Market Statistics menu, which
is a sub-menu of the Statistics. Market Cards are opened from the Market
Cards section of the Cards module. After entering the required information
into the Market explanation section in this field, it should be saved
in order to add into the program. Information that can be changed optionally
such as the reason for arrival is entered into the Source field.
Entered records can be found quickly in the filter section by means of
the information entered into the Special Code-1-2-3 fields. For
example, if a group that is accepted to the hotel, is recorded to the
special code field with an own group name, finding that group by entering
the group name determined in the special code field in any filter will
help to save time. Date of the Booking operation is displayed on the Booking
field. Date, when the booking was sent to the hotel, is transferred into
the Sent field. F5 key is pressed or Save button
is clicked to save.
Group
Booking
Group Booking Card is opened for the guests arriving as
a group by means of an agent.
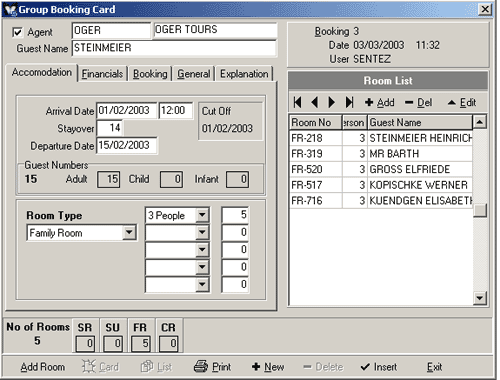
Figure 4 Group Booking Card
By means of the
Agent field, agent concerning the group is selected and agent default
is appointed. If the Agent button is not marked, the program will
not allow to make any selection about the agent.
Name and surname of the guest, who made the booking, is entered into the
Name field. In order to enter the name of the guest, either press
the F7 key or click on the List button. Guest Card Filter
is displayed. Guest List is displayed after the filtering operation. Guest
name is selected here and transferred into the Name field in the Group
Booking Card section. If the Guest Card was not defined beforehand,
press on the F4 key or click on the Card button to open
a new Guest Card. Alternatively, you can enter the name and surname
of the new guest into the Name field and press ENTER. A question
is displayed on the screen as Name could not be found. Create new
Card? If the answer to this question is YES, the Guest Card
is opened. All information is entered into the Guest Card and saved. This
information that was entered during the booking, is transferred into the
Check-In Card after the CheckIn operation.
NOTE:
If group bookings in your hotel need to be processed quickly, enter the
SentezDelux Setup Program / Front
Office Parameters and select Yes in the Fast Booking field. Thus,
Group Booking screen is displayed different at the opening. Number of
the rooms on the basis of how many persons will accommodate in a room
such as 1 Person, 2 Person, 3 Person etc. according to each room type
(for example, according to the Triple Bed Room type) is determined in
the Fast Booking field. Details can be processed later.

Figure
5 Fast Group Booking Card
F5 key is pressed or Insert button is clicked to save.
Group Booking Card Accommodation
Window

Figure 6 Group Booking Card / Accommodation
Operation date
and hour is displayed automatically on the Arrival Date field.
Date calculated by subtracting the Cancel Deadline period from the Arrival
Date is displayed automatically on the Cut Off field and cannot
be changed. Required notice about the certainty of the booking should
be given to the hotel authorities until the Cut Off date by the Customer
or Agent.
Number of days that the guest will accommodate is entered into the Overnight
field. Number of the days entered into this field affects the departure
date automatically. Departure date of the guest is automatically displayed
on the Departure Date field according to the number of days entered
into the Overnight field. If required, departure date can be written without
entering the number of overnights. This time, number of overnights are
calculated and transferred to the Overnight field by the program automatically.
Numbers of guests in three categories as Adult, Child and Infant are entered
into the Guest No field.
Group
Booking Card Financial Info Window

Figure 7 Group Booking Card / Financial Info
Boarding type of the booking is selected
from the list in the Boarding Type field by clicking on the select
button. (B&B, FB, HB, etc.) Boarding types are parametric and depending
on your hotel, they can be defined from the SentezDelux
Setup Program / Front Office Parameters section.
If there is an Account Card of the guest or organisation subject to booking
defined beforehand, relevant account is selected among the Account
Card List displayed on the screen by clicking on the List button
in the Main Account field. If there is not an account like that
and it should be opened at that moment, instead of exiting from the Card,
click on the Card button on the field to open the account.
If there is an extra Account Card of the guest or organisation subject
to booking defined beforehand, relevant account can be selected from the
account card list displayed by clicking on the List button in the
Extra Account field. Otherwise, Card button is clicked to
open a new Extra Account Card.
NOTE: In case that Main Account and Extras Account are not opened,
these accounts are opened automatically by the program during the check-in.
Opening of the accounts automatically is healthier for the program.
Foreign currency type concerning the booking price is selected by clicking
on the select button in the F .Currency Type field. Since
the information that will be displayed on the screen is parametric, required
foreign currency types can be added to the program.
If the Change Rates were entered on a daily basis, rate of the selected
foreign currency type at the relevant date is automatically displayed
on the F. Currency Rate field. If required, a different foreign
currency type can be entered. If the foreign currency rate of the present
date was not processed, the latest entry is displayed automatically on
this field. Number of the booked rooms that are free of charge is determined
by means of the rate entered into the Free Rate field.
Numbers of the rate tables defined in relation to the accommodations of
the guests or organisations are entered into the Rate Table field.
In order to list the Agent Room Rate Tables defined in this field, select
from the list displayed by clicking on the List button. If the
required rate table is not in the list, a new rate table is opened by
clicking on the Card button.
NOTE: If the rate table number is not determined, price is calculated
on the basis of the agent room rate, if there is.
In the Rate Type field, it is determined whether the accommodating
guest will be affected from the rate changes during his/her accommodation
or not by selecting one of the Fixed or Variable options.
When the Fixed option is selected, boarding rate will not be changed
during the accommodation.
Now, lets analyse the properties of fixed and variable options with an
example Lets assume that room rate for FIRCHO Tourism is defined.
Its validity is between 01/07/2000 - 30/07/2000
And the prices are as follows:
01/07/2000*15/07/2000 => 60 USD
15/07/2000*31/07/2000 => 90 USD.
If the fixed option is selected, room
rate that was valid at the arrival of the guest to the hotel will be valid
until the guests departure. Lets assume that the guest arrived the hotel
on the 1st of July 2000. Even if he / she will stay until the 31st of
July 2000, he / she will be charged from 60 USD per night.
If the variable option is selected, the program will calculate
the price according to the room rate at the arrival date until a new room
rate is defined. By that date, the new room rate will be valid and the
price will be calculated according to the new rate. To clarify with an
example, lets assume that a guest arrived the hotel on the 13th of July
2000. According to the room rates given above for FIRCHO Tourism, he/she
will be charged 60 USD per night for the 13th and 14th of July 2000, and
90 USD per night by the 15th of July 2000.
It is selected from the list whether the
foreign currency type is fixed or variable in the F. Currency Type
field.
When the option is selected as fixed, the room rate will not
be affected from the rate changes during the accommodation.
When it is selected as variable, the room rate will be affected.
In order to do this, foreign currency rates should be processed on daily
basis.
Discount that was defined in the agent card is entered into the first
box of the Discounts field, while the discount rate that will be
applied on this discount is entered into the second. Codes of the revenues
defined in the SentezDeLux Program
/ Packages List section is entered into the Packages field. If
the defined packages were entered into the Booking and Check In card,
they are processed into the account automatically after the night audit.
Payment explanation about the booking is entered into the Payment Explanation
field. Thus, the payment explanation concerning the person can be followed.
Group
Booking Card Booking Window

Figure 8 Group Booking Card / Booking
Booking type
is selected among the list in the Booking Type field. (Definite,
Tentative, Waiting List, Delete, Turnaway)
When
the booking type is selected as Tentative, date and hour acknowledged
for the option is entered into the Option Date / Hour section at
the Option Information field. Required explanation concerning
the defined option is entered into the Option Explanation field.
If the booking is not selected as Tentative, the program will not allow
any information entry to this field.
When the booking type is selected as Cancellation, reason of
the cancellation is entered into the Cancellation Explanation
field. If the booking is not selected as Cancellation, the program will
not allow any information entry to this field.
NOTE: When the recorded booking is to be cancelled, select it from
the Booking List first. Then, take the booking to the Booking Card screen
and select the Delete option before saving the operation. By this token,
it is possible to see the Cancelled bookings for the required date.
If the Delete button beside the Record button is clicked,
and the displayed question as Are you sure to delete? is answered
as Yes, the booking will be deleted from the program entirely
and it will not be possible to access to this record again.
Group
Booking Card General Info Window

Figure 9 Group Booking Card / General Info
Booking Card being searched in the Booking List
section can be found by means of the code entered into the Group Code
field. It will be sufficient to enter the Group Code on the list.
In this way, bookings concerning this group code are displayed easily.
General requests or properties concerning the person are entered into
the Explanation field.
In the Nationality field choose the nationality of the guest from
the list.
If there is, market information is selected from the list in the Market
field.
The way that the customer had learned and reached the hotel is entered
into the Source field as info. (Recommendation, advertisement etc.)
Special codes in relation to the Booking card can be defined in the Special
Codes field. Whether external quota concerning the agent will be accepted
is determined in the External Quota field.
Validation date interval of the bookings that will be checked in and will
be valid for the action can be found in the Booking Date field.
Date, when the booking was sent to the hotel, is found in the Sent
Date field.
Booking
List
List of bookings entered from the Booking Card field
is displayed in this section. Booking Filter is displayed initially
when the Booking List is selected. Filters are displayed before each listing
and reporting operations. Purpose of these filters is to have full and
easy access to the required information. During the use of filters, use
the left side as the starting point and the right side as the finishing
point.
To clarify this with an example, if OGER is entered into both sides
in the "Agent Code" field, bookings only made by the
agent with the code OGER are displayed on the screen..
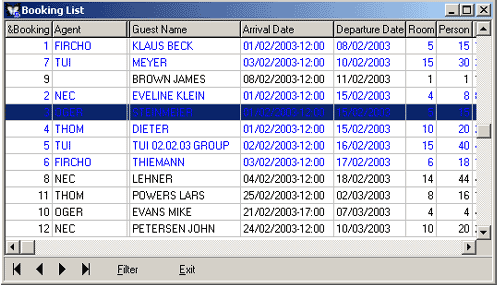
Figure 10 Booking List
Number of the booking in question is entered into the Booking field.
Agent code concerning the person or group is displayed in the Agent
field.
Name of the person is displayed in the Guest Name field.
Arrival date concerning the booking of the guest is displayed in the Arrival
Date field. Departure date concerning the booking of the guest is
displayed in the Departure Date field.
Number of the rooms that were booked is displayed in the Room field.
Pax concerning the booking is displayed in the Pax field.
Required selections can be made from the displayed menu in the Booking
List by either right clicking with the mouse or clicking the Detail
button.
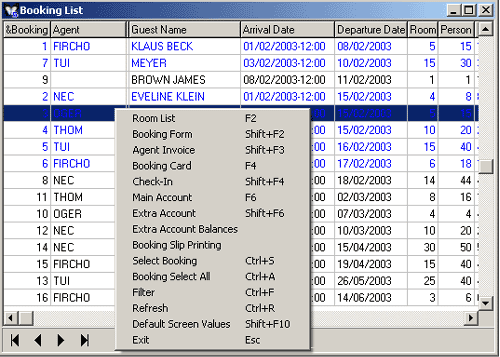
Figure 11 Booking List
Rooms concerning the booking are displayed by either selecting the Room
List or pressing on the F2 key. If there are any allocations,
they are reflected on the screen.

Figure 12 Booking Room List
Booking
Form can be displayed by using either the Booking Form or the SHIFT+F2
keys. Agent Invoice can be sent to the screen or the printer by either
selecting the Agent Invoice or using the SHIFT+F3 keys.
Booking Form concerning the Booking can be displayed on the screen
by either selecting the Booking Form from the displayed menu or using
the F4 key.
All rooms concerning the booking card in question is Checked - In by either
selecting the Check - In option or pressing on the SHIFT+F4
keys. Alternatively, and if necessary, one by one check - in method from
the booking room list can also be used.
Main Account Info concerning the person can be displayed on either clicking
on the Main Account Info or pressing on the F6 key.
Extras Account Info concerning the person can be displayed by either clicking
on the Extras Account Info or pressing on the SHIFT+F6 keys.
Extras Account Balance concerning the rooms can be displayed by
selecting the Extras Account Balance.
Slips concerning the booking is possible to print with the Booking
Slip Print select.
If Select Booking is clicked on and required bookings are selected,
agents can be provided with agent invoices. After the selection, right
click on the Agent Invoice (SHIFT + F3) so that invoice output
can be taken on one of the options such as Screen, Printer etc. to be
selected.
By either clicking on the Select All (CTRL+S) option or using the
CTRL+A key combination, all invoices can be selected practically.
Then, Agent Invoice (Shift + F3) output can be taken.
If the Default Screen Values option is selected, changes on the
booking list are cancelled and the screen returns to its original values.
(SHIFT+F10)
Realize
Room Allocation
İlgili
olan rezervasyon, rezervasyon listesi üzerinde bulunduktan sonra mouse'
ile sağ tıklama yapılarak yada Detay düğmesina basılarak Oda
Listesi seçeneği seçilir. Açılan pencerede blokaj yapılacak olan
oda bulunur. Üzerinde tekrar mouse ile sağ taraf tıklanır ve Boş odalar
penceresinin açılması sağlanır. Boş odalar penceresi rezervasyon yapılan
tarihte mevcut olan satılabilir odaları listeler. Blokaj yapılacak olan
oda iki kere tıklanarak seçim yapılır ve oda blokajı gerçekleştirilir.
Remove
Room Allocation
In order to remove the allocation of a room, Remove Room Allocation
option is selected among the list displayed by either right clicking on
the Room List field or clicking on the Detail button. Thus,
the room becomes vacant in status.
Change and Cancel Booking
Display the booking list. Room List
(F2) is selected among the list displayed by either right clicking
on the Booking List or clicking on the Detail button. Booking Room
List is displayed on the screen.
When you are on the Booking Room List, stop on the room, on which
operation is necessary. Room Info (F4) is selected by either right
clicking with the mouse or clicking on the Detail button. Booking
Room Card is displayed on the screen.

Figure
13 Booking Room Card
If Changes
are required on the Booking Room Card, changes are made on the required
fields and new records are saved by either the Record button or
the F5 key.If the Booking Room Card will be deleted permanently,
either click the (-) Delete button or press the F6 key.
If Check In operation was already done, booking card cannot be deleted.
A warning message is displayed such as Please cancel Check-In operation,
prior to delete the record. In addition, Undo Check In operation
can only be made on the operation date. Check In operation cannot be
undone, if the operation date is passed.If the booking is required to
appear as cancelled instead of deleting it permanently, Cancel
option in the Booking Type field is selected.
Check
In with Booking
Booking
list is opened. At the operation date and on the record to be checked
in, Check - In (Shift + F4) option is selected among the list
displayed by either right clicking on the field or clicking on the Detail
button.
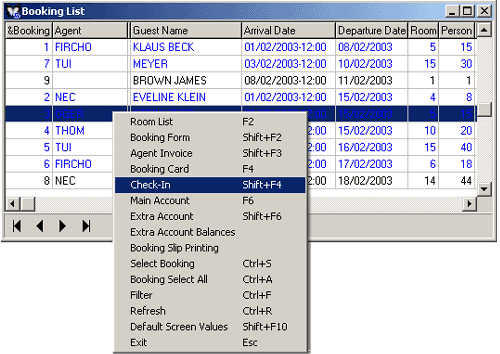
Figure 14 Booking List / Check - In
The question Start Check In? is displayed
on the screen. If the answer to this question is Yes, Check
In operation starts. If No is selected, List screen is displayed
again.Following questions are displayed on the screen in turn in order:
Create only ONE MAIN account card for all rooms?; Create
Extras Account Card?; Create only ONE EXTRAS account card for
all rooms?. These questions are answered as Yes or No
according to the Check In card to be opened. Check In Card is opened
as a result of the answers. On the Check In Card, the first question
to be answered is as follows: Generate automatic room number?
If the answer is Yes, Room Numbers are appointed by the program
automatically. In order to approve the room numbers displayed, answer
Yes to the next question, which is Confirm Room No?.
If the automatic appointment of the room numbers is not preferred, room
numbers can be selected among the Vacant Room List displayed by clicking
on the List button.
In the operation date field concerning the guest being checked in, Check
In operation can be cancelled by selecting Check In Undo option
on the Booking List screen and bringing the room to vacant status.