Receipt
List
Receipt List section is selected in order
to get the list of Front Cash receipt entries. Initially, “Receipts
Filter” is displayed on the screen. Required information is accessed
by making limitations on the relevant fields in this filter.

Figure 10 Receipts Filter
Receipt
type (Department Income Receipts, City Ledger Receipts, Change Receipts,
Credit Collection Receipts, Account Transfer Receipts), for which the
list is required, is selected among the list displayed by clicking on
the select button in the Receipt Type field.
Department Revenue Receipt List is displayed when relevant filters
are executed and OK button is clicked. When you are on the selected
record in the Department Income Receipt List, the Receipt can be displayed
by clicking on the Detail button.
If the Department Revenue Receipt is selected in the Receipt Type field
during the filtering, the Blue typed
receipts in the displayed list express the Front Cash Receipts, and the
Black typed receipts express the Department Revenue Receipts.
In the Receipt Type field, if the Credit Collection Receipt is selected,
the receipts will be in Blue colour;
if the City Ledger Receipt is selected, they will be in lilac;
and if the Change Receipt or Account Transfer Receipt is selected, the
receipts will be in Black color.
In the filter operation, if the “Only Complimentary Receipts” option
is selected by clicking on the select window, displayed receipts appear
in Red colour in the Complimentary
field.
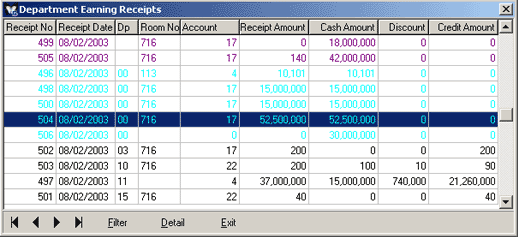
Figure
11 Department Receipts
In order to select and change the receipt, Receipt Date and Operation
Date must be the same.
After executing the required operations, they are saved with either pressing
on the F5 key or clicking on the Insert button.
Account
Invoice Control List
By means of the Account
Invoice Control List, printed invoices and amounts on the account are
displayed.

Figure 12 Account Invoice Control List
In the Account No field, number of the account
that was operated is displayed.
In the Type field, it is possible to see the account types by means
of the differentiation as Main Account and Extras Account.
Whether the account is open or closed is displayed on the Status
field automatically.
Agent code concerning the account is displayed on the Agent Code
field.
Guest name is displayed in the Guest Name field.
Credit concerning the account is displayed in the Credit Amount
field.
Debit concerning the account is displayed in the Debit Amount field.
Invoice number is displayed in the Invoice field.
The amount of the credit -that was invoiced- of the account is displayed
in the Amount field.
Account Output is displayed by clicking on the Detail button after doing
the relevant filters in the Account Filter.
Blue coloured receipts on this screen
express the Front Cash Receipts, while Black coloured ones express
the Department Income Receipts and Red
coloured ones express the complimentary free receipts.
Relevant receipt is displayed on the screen by double clicking on the
receipt. Two options as Default Screen Values and Department
Based Totals (Shift + F11) are displayed when right click is applied
on the receipt.
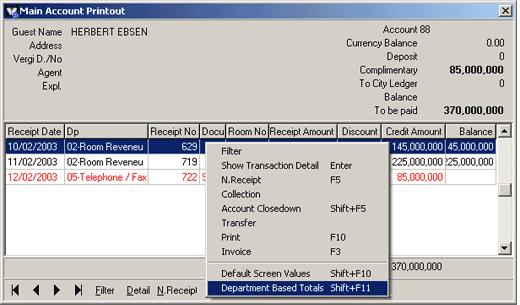
Figure 13 Account Output
Department
Totals section is displayed at the right side of the screen when Department
Based Totals option is selected. Thus, department expenses can be
displayed.
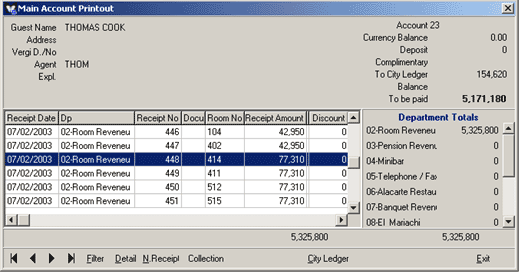
Figure 14 Account Output
In case that Earning Based Totals (Shift
+ F11) option is selected from the options displayed by right clicking
on the receipt screen, Revenue Totals is displayed at the right side of
the screen. Distribution of expenses according to revenues can be seen
in the Revenue Totals section.
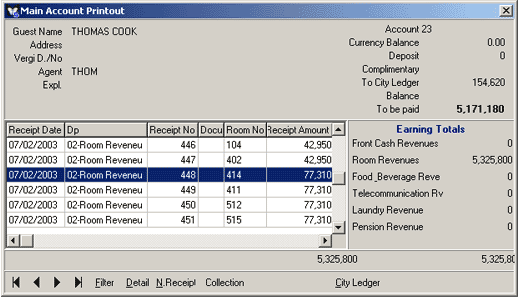
Figure 15 Account Output
If the Don’t Indicate Totals (Shift + F11)
option is selected from the options displayed by right clicking on the
receipt after opening the Revenue Totals window, the screen will return
to its initial appearance. No total is displayed on the right side.
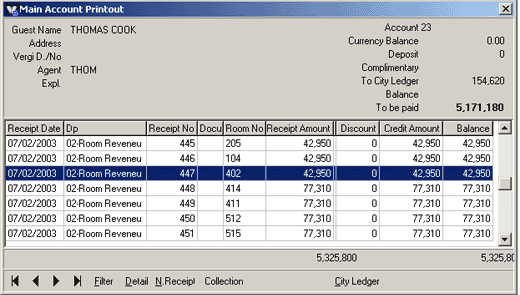
Figure 16 Account Output
Telephone
Callings List
This
is the list displaying the daily phone calls.
.
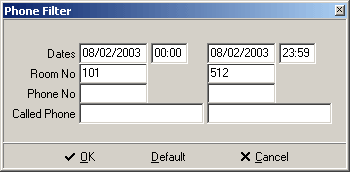
Figure 17 Telephone Filter
When we enter the telephone callings list, we can
make certain limitations on the filter displayed initially. By means of
this filter, we can have access to the phone calls between the required
dates and make room number limitations, in addition to the filters by
entering the telephone numbers dialed by the hotel personnel and numbers
of the opposite side. For example, if 101 and 512 are written to the Room
No fields, phone calls of all rooms between these two numbers are displayed
as the result of the filtering.
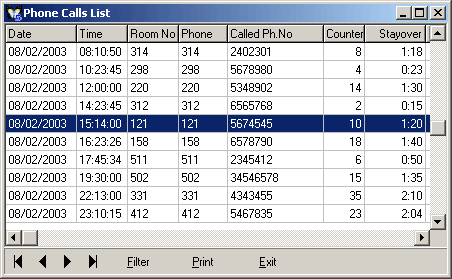
Figure 18 Telephone Callings List
Date of the phone call is displayed on the Date
field.
Time info of the phone call is displayed on the Time field.
If the phone call is made from a certain room, relevant number of the
room is displayed on the Room No field.
Telephone number of the place or internal number of the room that made
the calling, is displayed on the Telephone field.
Dialed/called telephone number is displayed on the Called Tel No
field.
Total contour is displayed on the Contour field.
Name of the guest, who made the calling, is displayed on the Guest
Name field.
Required information can be accessed via
the Telephone Callings List or Room Based Callings List
by right clicking on the list screen.
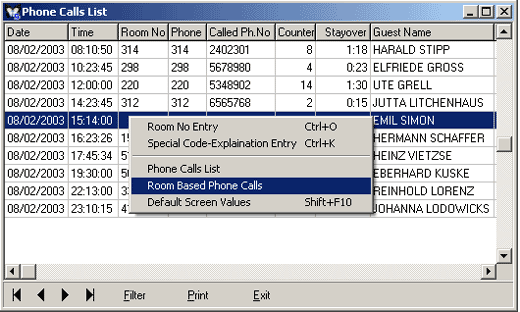
Figure 19 Telephone Callings List
Information in relation to the phone call credit is entered by double
clicking on the required phone call record among the list.
N: (relevant account number) for Cash accounts; K: (relevant
account number) for Credit accounts and Room No info for Room Account
is entered into the Room No field.
By clicking on the OK button, phone call is transferred to the
relevant room or account.
Coloured phone call records in the list express that the phone call has
been transferred to the account or the room.
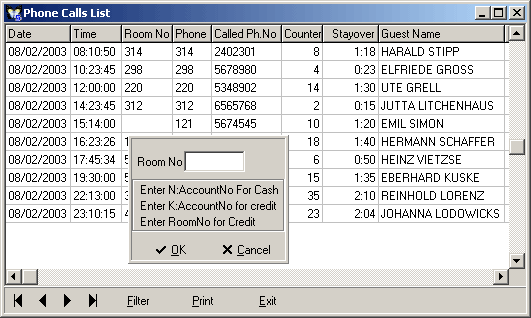
Figure 20 Telephone Callings List
Cash Status
Cash totals of either all departments
or only the required ones are displayed for the required date.
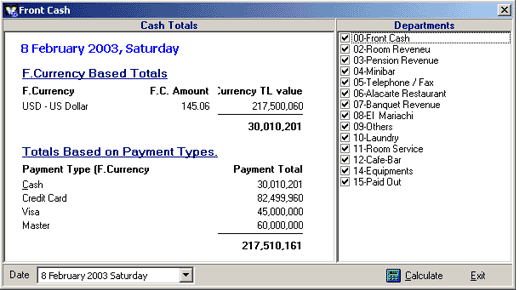
Figure 21 Cash Status
Date,
when the cash total is required, is entered into the Date field.
Date is displayed automatically at the opening.
After selecting the departments by marking in the Departments field,
Cash Status on the basis of departments is displayed by clicking on the
Calculate button.
Change
Receipt
Receipt
entries in relation to the foreign currencies that are changed by the
guests accommodating in the hotel are made on this receipt screen.
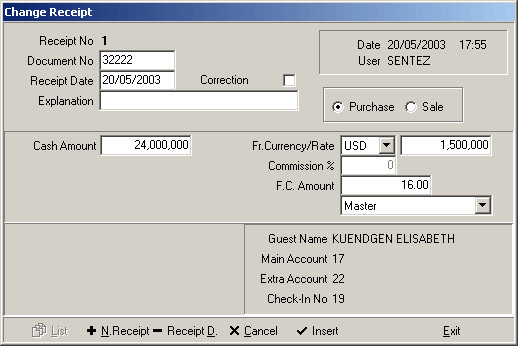
Figure 22 Change Receipt
Document number in relation
to the change operation is entered into the Document No field.
Date of the operation is entered into the Receipt Date field.
Correction box is marked in order to correct the excess amount
entries concerning the receipts entered beforehand. ( - ) Balance entry
is made in the name of the department that the correction receipt entry
is required. When the main account summary is taken, it is displayed that
( - ) amount and the real amount are added to transfer.
Any explanation relevant to the operation can be entered into the Explanation
field.
TL equivalent of the changed amount is entered into the Cash Amount
field.
Foreign currency type that will be changed on the receipt is selected
among the list by clicking on the select window in the Foreign C. Type
/ Rate. Exchange rate of the determined foreign currency on the operation
date is transferred automatically.
If any commission will be taken in relation to the Change operation, a
certain amount of Commission Rate from the SentezDelux
Setup Program / Front Office Parameters section will be defined in the
Commission field. This rate is displayed on the Change Receipt
automatically. If the “Commission rate cannot be changed” option
is selected in the parameters, displayed value as the commission rate
cannot be changed. Otherwise, entered value is still displayed, but the
program allows the entry of a different value.
Foreign currency amount that will be received in TL equivalent is entered
into the Foreign C. Amount field.
If the F5 key is pressed or the Insert button is clicked,
“Print Receipt?” question is displayed. If the “Yes” button
is clicked, the report can be displayed on the screen, sent to the printer,
imported to Word etc.
Daily
Change Rates
This
is the screen where change rates are processed and followed.

Figure 23 Change Rates
Change rates are processed on the relevant foreign
currency row according to the defined date in the Date field.
Relevant date can be written into the “Date” field in order to
display the change rate entries of the past days.
In order to save the processed change rates, either F5 key is pressed
or Insert button is clicked.
Change rates that were processed into the foreign exchange list are displayed
automatically on the Foreign C. Rate field during the receipt entry or
exit operations executed with the relevant foreign currency.
Foreign currency rate information is saved by either pressing on the F5
key or clicking on the Insert Button.
Cash Transfers
Cash Transfers List
This is the screen on which take
over transactions of the department cashes in the hotel can be followed
on a daily basis.

Figure 24 Cash Transfers List
The department, whose turn over is to be displayed, is selected
among the list by clicking on the select window in the “Department” field
at the lower part of the screen.
Relevant information can be found in the fields of “Date”, “Shift”, “Department”,
“Take Over Amount” and “Take Over TL” concerning the selected department.
Night
Audit
Night
Audit
This is the screen where take
over operations of all operations executed during the day to the following
day are processed.
Present date is automatically displayed on the Date field and night
audit operation is executed according to this date.
Start (F1) button is clicked in order to start the night audit
operation. If the “Start Night Audit?” question is answered as
“Yes”, the operation starts.

Figure 25 Night Audit
By means of this operation, all
room rates are processed into accounts automatically. Reports that were
selected at the SentezDeLux Setup
Program / Front Office Parameters section, are prepared automatically
with the Night Audit operation.
Night
Audit Values
This is the screen, where information formed as the results of the night
audit operation.

Figure 26 Night Audit Values
Night audit info is displayed when Night Audit Values screen is first
opened. In order to display the night audit info regarding the past days,
Previous button; in order to display the night audit info regarding
the next days, Next button; and in order to display the night audit
info of the present day, Today button is clicked.
Number of the rooms for sale in the hotel is displayed on the Available
Room field.
Number of the rooms ready for sale in the hotel is displayed on the Room
Ready for Rent field. (The number in this field presents the number
of the rooms except from the ones such as At Maintenance, OOO Trouble
etc. that were entered into the Room Maintenance screen from the Cards
section of the SentezDeLux program.)
Sold Room field presents the number of the rooms occupied by the
guests accommodating in the hotel.
The first field in the Guest Count fields is for adults accommodating
in the hotel, while the second is for children and the third for babies.
Complimentary field presents the number of the rooms that are complimentary
in check - in type.
House Use field presents the number of the rooms that are house
use in check - in type.
Single Usage field presents the number of the rooms being used
as single.
Arrivals (Rooms / Person) field presents the following: the date
when Night Audit Value was executed, total number of the rooms that the
check - in operation was completed for, and total number of the guests,
whose check - in was completed.
Departures (Rooms / Person) field presents the following: the date
when Night Audit Value was executed, total number of the rooms that the
check - out operation was completed, and total number of the guests, whose
check - out was completed.
Walk - In (Rooms / Person) field presents the following: total
number of the rooms that the check - in operation was completed for Walk
- In guests, and total number of the guests, whose check - in was made.
Movements of Total Income, Cash Collection, Total Discount, City Ledger
and Credit Collection in TL and foreign currency in relation to the day
when Night Audit Values are made, are followed, corrections are made and
saved in “TL Amount” and “F.C. Amount” fields, which are
at the right side of the Naght Audit Values screen.
In order to make changes in this section, required changes are made at
the relevant field and are saved by either pressing on the F5 key
or clicking on the Insert button.
Room
Takeover
This
is the screen, where information about the room totals as a result of
the night audit can be followed.

Figure
27 Room Totals
Room totals info is displayed
when the Room Totals screen is first opened. In order to display the room
totals info regarding the past days, Previous button; in order
to display the room totals info regarding the next days, Next button;
and in order to display the room totals info of the present day, Today
button is clicked.
Check - In numbers, room numbers, main account numbers and balances, and
extra account numbers and balances of all rooms in relation to the date,
when the take over information is taken, are displayed on the Room Totals
screen.
Invoice
Operations
Stop on the relevant room in the Room Rack
screen or Check - In List, and click on the Detail button.
Display the Account Filter by selecting Main Account (F6) from
the displayed list. Main Account Listing is displayed if OK
button is clicked after filtering the required fields.
Invoice form is opened on the Main Account Listing screen when the Invoice
button is clicked.
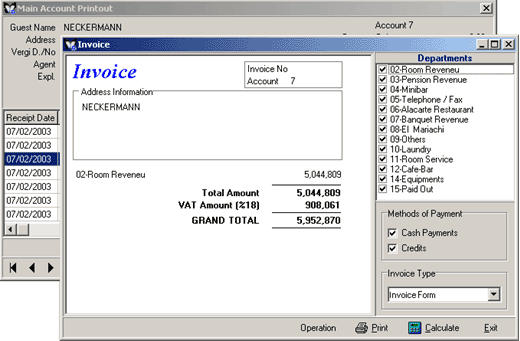
Figure 28 Invoice
Distribution of payments for the invoices that their expenses are already
done and invoices are requested, is possible by marking the Departments
according to different persons who have the same account.
Cash Payments or Credits is selected in the Methods of Payment
field according to the customer’s request.
And in the Invoice Type field, required select can be made according
to the defined Invoice Types (For example, Invoice Form, Detailed Invoice
Form) for your hotel in the SentezDelux Setup Program / Form Definitions
section by clicking on the select window.
If there are transactions that were not reflected to the invoice, they
are displayed on the invoice screen after doing the necessary calculations
by clicking on the Calculate button.
Operation screen, on which Address Info is, is displayed at the lower
left corner of the Invoice screen by clicking on the Operation
button. Required changes can be made and transferred to the invoice on
this screen.
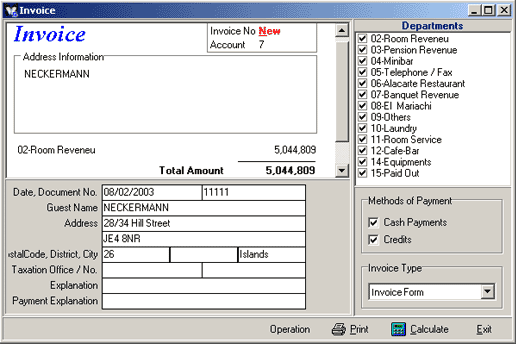
Figure 29 Invoice
And when the Print button is selected, one of the options including
screen, printer etc. is selected and invoice output is taken.