Hotel
Status
Information
entry into the Room Status Table cannot be made, since the information
required for the follow up of the rooms is automatically transferred to
this table. Status such as vacant or occupied, general room information
etc. are displayed.
Room List in relation to the relevant status are displayed by clicking
on the buttons in the Rooms with Trouble, Checked-In Rooms, Arrival Rooms,
Reserved Rooms and the Occupied Rooms Total fields.
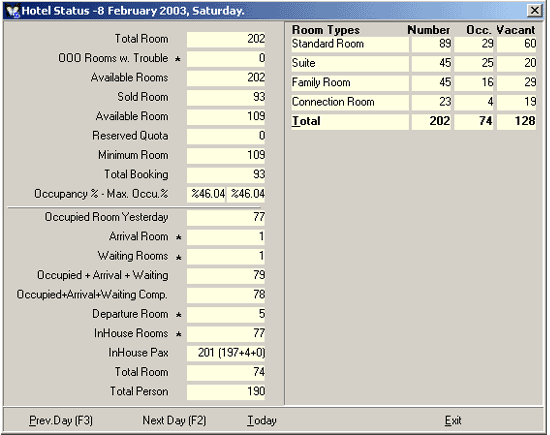
Figure 15 Room Status Table
Forecast
Chart
This
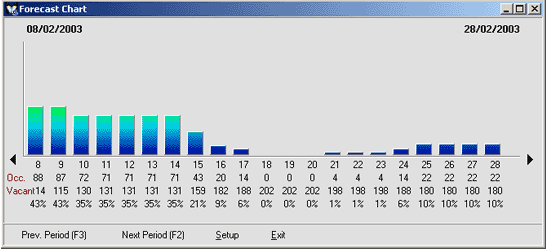
is the report screen that the booking allocations of the agents or the
individual guests can be followed on the basis of day, rate and occupancy.
Room Status Table, Booking List, Check – In List or Occupancy Detail screens
can be opened among the list displayed by right clicking on the Days section.
Figure
16 Forecast Chart
Previous Period (F3) and Next Period
(F2) buttons in this field are clicked to see the occupancy rates
of the previous and next periods. Dimension adjustments of Forecast Chart
screen can be set by clicking on the Setup button. Together with
the top and left margins, width and height of the Forecast Chart screen
are set with the Setup property. If Show Quotas box is marked on
the Forecast Chart Setup screen, quotas separated for each room are displayed
on the Forecast Chart screen as well.
Availability
This is the screen, where room status and rates
are displayed according to the requested period. It is very easy to go
to the required date with the use of the calendar above. Let's assume
that set up period is 15 days. Displaying the previous and next periods
is also as close as a button. .

Figure 17 Availability Form
Selecting the Previous Period (Shift + F3)
from the menu, that is accessed by a right click, will display previous
information as far as the determined period. When the Previous Day
(F3) and the Next Day (F2) are selected, one day before and
after are accessed, as it can be understood from the functions’ names.
Subsequent information until the determined period will be accessed when
the Next Period (Shift + F2) field is selected. All information
entries are updated at the Refresh field.
Reception
By
reflecting the settlement plan of the hotel on this form, it will be easier
to find the rooms with a sea view, the rooms at the corner and the cards
on which these rooms are. This information has parameters and requested
properties can be reflected to the rooms.

Figure 18 Reception
The menu
containing the possible operations of the reception department is opened
by right clicking on the rooms in the Reception section.
Check – In information concerning the person can be displayed by either
selecting among the list or pressing on the F4 button after clicking
on the Check – In Info. Customer check – in operation can be executed
by clicking on the Check-in (SHIFT+F4). In order to change a customer,
who was mistakenly checked – in, back to the reserved status, select the
Undo Check – In or CTRL+F4 option.
Information regarding the condition of the room (clean and dirty) can
be defined by clicking on the Room Status.
Hotel Card Information concerning the person is displayed by clicking
on the Hotel Card Info. Main Account Output can be displayed by
either clicking on the Main Account Info or pressing the F6
button.
Extras account information concerning the person can be accessed by either
clicking on the Extra Account Info or pressing the SHIFT + F6
key combination.
All receipts in relation to the selected room can be processed quickly
by either clicking on the Receipts or pressing the CTRL+F key combination.
Collections from the Guests can be executed by clicking on the Collections
or pressing on the CTRL+T key combination. By means of this operation,
payment of the guest is subtracted from the main account information and
displayed as paid.
Guest messages concerning the person is entered by either clicking on
the Guest Messages or pressing on the F7 key. By this token,
they are kept in the records. Until the message is reached to the guest,
letter sign is displayed on the Room.
Wake-up messages concerning the person is entered by either clicking on
the Wake-up Messages or pressing the SHIFT+F7 key combination.
By this token, they are kept in the records. If wake up operation can
be executed by the switchboard, SentezDelux
program can adapt to this function. Until the wake up date, a Bell sign
is displayed on the rooms with wake-up messages.
Check – Out operation is started by either clicking on the Check –
Out or pressing on the F8 key, if the guest will depart from the
hotel.
Changes on the Check – In card are displayed by clicking the History button.
Before-the-change values are displayed, and date and hour of the changes
are also listed.
By means of the Screen Arrangements, changes on the cards in the
displayed Reception window can be made. In this operation, screen set-up,
which is provided by the program, is used.
Room Rack
This is the screen, where the rooms in the hotel
are displayed in a tabular format. In order to have access to the existing
rooms information, either right click on the relevant room or click on
the Detail button. In order to see the room status of the rooms
in the previous and next days periodically, click on the Previous Day
(F3) and Next Day (F2) buttons.Operations can be executed after
entering the required screen, from the menu list displayed, by clicking
on the Detail button.
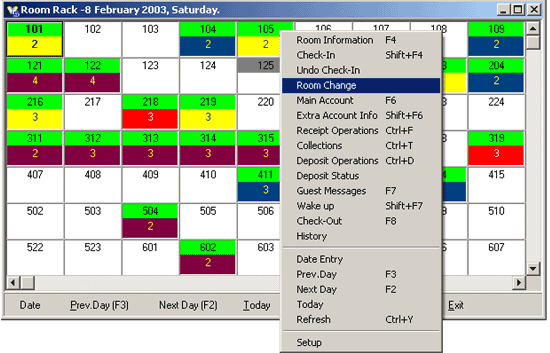
Figure 19 Room Rack
Select Check - In (Ctrl + F3)
By means of the Check – in option, that is used for the combination
of Main and Extras Accounts, it is possible to combine all accounts, main
accounts only, or, if requested only extras accounts.
Room Info (F4)
Check – in card concerning the requested Check – in record is displayed.
Check – In (Shift + F4)
Check – In Card is opened with this function. Requested changes are
made on the Check – In Card and saved.
Undo Check - In
Check – In operation made for the room is cancelled with this function.
Room Status (F5)
Click on the vacant room. With this function, you can sign the room status
as dirty or as clean after the room is cleaned.
Room Change
It is used to change rooms. After pointing on the room to be changed,
either click on the Room Change press. It will be sufficient to
click on the &OK button after entering the room no into the displayed
field.
|
|
Program will not allow any Room Change operation if the guest is being allocated into an occupied room. Room Change operation is realised by selecting a vacant room. |
Hotel Card Info
Hotel Cards are defined with the purpose of following all expenditures
made with the cards, instead of money, opened specially for each guest,
from the day the customer checked in to your hotel to the day he/she will
check out, and with the purpose of executing the operations during the
Check - Out by returning to the Card Info.
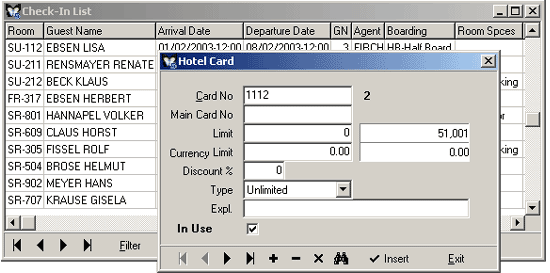
Figure 20 Hotel Card Info
A
special card number for the customer is entered into the Card No
field.Main Card number of the person, who will make the payment during
the Check – Out, is entered into the Main Card No field.
In the direction of the customer’s request, a certain amount is entered
into the Limit field in order to limit his/her expenses. After
the expenses are made, the amount spent is displayed automatically on
the right side of the limit field.
In the direction of the customer’s request, Foreign Currency Limit is
entered into the Foreign C. Limit field. After the expenses are
made, the amount spent is displayed automatically on the right side of
the Foreign C. Limit field.
Discount rate to be applied is entered into the Discount field.
Type of the card provided to the customer can be selected by clicking
on the select window in the Type field. (Normal, Complimentary,
Warning, Unlimited).
Appropriate
explanation info is entered into the Explanation field. For example,
information about the number of the room can be entered into this field.If
the card is in use, relevant marking is made on the In Use field.
If the person using the card has already Checked – Out, this mark is removed.Hotel
Card Information entry is saved by either pressing the F5 key or
clicking on the Insert button.
Main Account (F6)
Folio Filter is displayed initially. Main Account is displayed by clicking
on the OK button after doing the required filters.
Extras Account (Shift + F6)
Extra account information concerning the person is displayed either selecting
or pressing on the SHIFT+F6 key combination.
Receipts (Ctrl + F)
Relevant Receipt Card is opened. Required entry is made and saved by clicking
on the Insert button.
Collections (Ctrl + T)
It is used to make the collections from the guests. Payments done by the
person are deducted from the main account and they are displayed as paid
with this operation.
Guest Messages (F7)
Guest Messages List is opened. Guest messages concerning the Guests are
entered by clicking on the New button. Date, Hour and Message of the entry
are saved with the OK button. Until the message is cancelled in
the Room Rack section, a letter sign is displayed on the room.
Wake Up (Shift + F7)
Wakeup Info window is opened. Wakeup Date and Hour according to the requests
of the guests are entered by clicking on the (+) Add button. After
saving, Wakeup Window can be exited by the Exit button. A bell
sign is displayed on the relevant room in the Room Rack Table. Until the
wake-up date, wake-up information is displayed when the mouse is clicked
on the room.
Check – Out (F8)
Check – Out operation is started with the Check – Out option if the guest
will depart from the hotel.
History
Check-In Date information of the previous accommodations of the guest
and amounts that were paid at the check-out operations of these stays
are displayed on the screen.
Undo Check-Out (Shift + F8)
Cancelling the Check-out operation for the rooms check-out operation
is already done, is executed by selecting Undo Check-Out (Shift + F8)
option with right clicking or clicking on the Detail button. If
the answer to the question “Do you confirm cancel check-out operation?”
is “Yes”, Check-out operation is cancelled.
| In order to see the list of booked rooms, Waiting List is displayed by either right clicking or clicking on the Detail button on the vacant room. Room Allocation is selected on the list by right clicking to display the guest expected to arrive the room. When the Undo Room Allocation option is selected on the room screen by clicking on the Detail button, the room will be displayed as vacant. If the mouse is right clicked on the Waiting List in accordance with the operation date, Check - In of the guests with bookings can be executed with the selection of Check – In. |
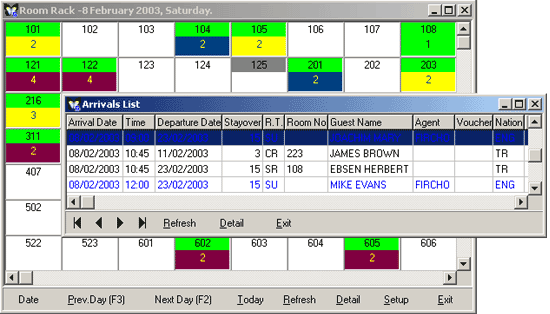
Figure 21 Waiting List
Room Plan
This menu displays all
rooms in one screen. It allows to execute the relevant operations and
display the room status in 9 day periods.
On the room plan screen, it is possible to see the person or agent that
made the booking, together with the room number and type subject to
booking.
You can select the dates with the Previous Period and Next Period buttons.
You can have access to the entry and exit times of the person who made
the booking together with the agent information by left clicking on
the required booking information.
Booking room card can be accessed by either selecting the room information
field or pressing on the F4 button at the menu displayed by right
clicking on the required booking information. By this token, detailed
information about the booking can be displayed. Changes can be made
on the card.

Figure 22 Room Plan
Vacant
Rooms List
Vacant
rooms’ list is displayed in the Vacant Rooms List section by clicking
on the OK button after filtering. Required information can be accessed
faster and easier with limitations in filtering.

Figure 23 Vacant Rooms List
Arrivals
List
This is the screen where
arriving guests at the operation date can be followed. Other related information
can be accessed by clicking on the Detail button on the relevant
row. Check – In operation is started for the guest that was booked beforehand
in the Waiting List by selecting the Check-In (Shift + F4).

Figure 24 Waiting List
Departures
List
This
is the window, on which the guests departing from the hotel on the operation
date can be followed as a list. Required operation is selected among the
options and executed by clicking on the Detail button on the relevant
line.

Figure 25 Departures List
Room
Change List
This
is the list on which the guests that changed their rooms at the operation
date, can be followed. Room change operation can be cancelled by selecting
the Undo RoomChange by right clicking.
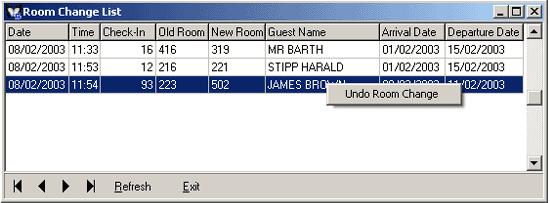
Figure 26 Room – Change List
Break
- Down Forecast
Distribution of the number
of Breakfasts, Lunches and Dinners according to the days until the selected
date is displayed by clicking on the select window in the Start
field. Titles such as Breakfasts, Lunches, Dinners etc. are defined at
the SentezDelux Setup Program / Front
Office Parameters and they are reflected to this section.A report of the
information on the screen can be generated by clicking on the Print
button.
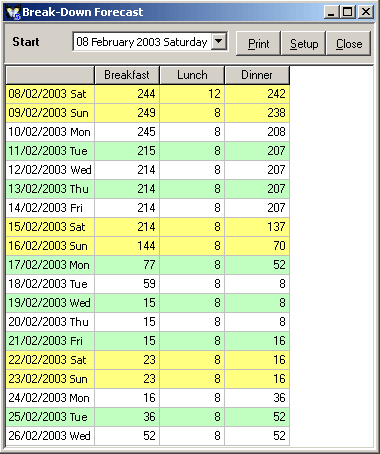
Figure 27 Break - Down Forecast
This is the section where room status information is displayed.
List of the guest expected to arrive on the basis of the entry date is displayed in the Arrivals section. Booking room card can be accessed by either selecting the room information field or pressing on the F4 button at the menu displayed by right clicking on the required booking information. Guest Messages List is displayed if F7 key is pressed on the information. By means of this list, messages of the customers that made their bookings are displayed. New messages concerning the guest can be entered by clicking on the New button. The message can be cancelled by clicking on the Delete button. Ýnformation entry is verified by the OK button. Detail of the message can be displayed by clicking on the Detail button on any message.
Information about the customers who had departed from the hotel is displayed in the Departures section. Check – In card of the guest can be accessed by either pressing on the F4 button or selecting the room information field from the menu displayed by right clicking on the required booking information. Main account output can be accessed after doing the required limitations in the filter displayed by selecting the Main Account Info field among the displayed menu with the use of the F6 key or right clicking on the mouse. Extra account information can be displayed by the Shift+F6 key combination. Check – Out operation can be undone with the Shift+F8 key combination.
When Filter button is pressed, date information is displayed at the lower left corner of the screen, Room status information is changed according to the last entry date, when the required date is selected from the displayed date card with the select button and pressing on the OK button. Room information, main account information, extras account information and history of the selected guest can be displayed by the Detail button.
 Figure 28 Room Status