INVENTORY CARD
Definitions, which are required for all inventories subject to follow-up,
are made in this section. General status, entry/exit costs, purchase and
sales transactions of inventories can be followed on the defined inventory
card.
In order to define an inventory card in the
SentezShop program, Inventory Card
option is selected from the Inventory module. Required definitions are
made on the displayed inventory card.
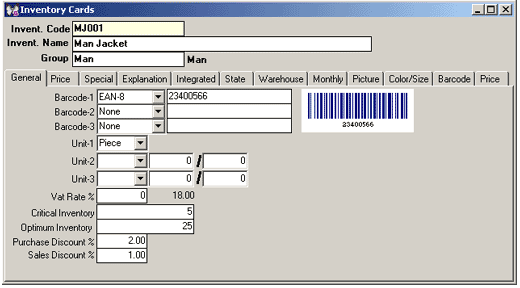
Figure 1 Inventory Card
The code that will ensure the follow-up of
the inventory in the program is entered as alphanumeric into the Inventory
Code field. Inventory code can be selected by displaying the inventory
cards list with the F9 key.
Figure 2 Inventory Cards List
| Fields in the Inventory Cards List such as Year, Type, Season, Base etc. are special fields and they are optional. These field definitions can be made from the Special section on the Inventory Card. Executed field definitions are displayed on the Inventory cards list as above. Limitations according to the information entries can be made on these fields. |
Inventory code that will be defined must not be more than 15 characters. The most important point to pay attention in assigning codes to the inventories is that they should facilitate generating reports from the program. Name of the defined inventory is determined in the Inventory Name field.Group definitions can be made for all inventories that were defined beforehand in the Group field. By collecting inventories under groups, you not only execute filtering according to the inventory group but can also get cumulative and detailed statistical reports on the basis of groups. In the program, there are search facilities of the defined inventories according to their codes, names and groups, as well as their barcodes and special codes. Therefore, names of all inventories with common features should be defined in the same way during the inventory name definitions.
GENERAL TAB
This is the section, where general definitions such as unit, discount,
VAT, barcode etc. in relation to the inventory are made.If barcode follow-up
of the inventory will be executed upon the unit defined first, the relevant
barcode number is defined in the Barcode-1 field. By means of the
assigned barcode number, inventory entry/exit operations can directly
be executed by the barcode readers. If barcode follow-up of the inventory
will be executed upon the second unit, barcode number is entered into
the Barcode-2 field. Barcode-3 field is used if the follow-up
will be executed upon the third unit.

Figure 3 Inventory Card / General Tab
Inventory barcodes defined on the basis of units take place on the right-hand side of the card screen.The first unit, with which the inventory will be followed, is selected among the units list displayed by the relevant selection window in the Unit-1 field.
| If the inventory unit to be selected is not on the displayed inventory units list in this field, the relevant definition is made at the SentezShop General Parameters section. |
If there are the second and third inventory
units, with which inventory operations are executed and followed, they
are defined in the Unit-2 and Unit-3 fields according to their unit multipliers
and divisors.
In the SentezShop program, one inventory
can be followed and operated with three different units. Units that the
inventory transactions are executed with should be defined in the inventory
card in turn in order. There is no obligation to define the units from
the smallest to the largest or vice versa during the unit definition.
When the unit for inventories will be defined, the unit that will form
the basis of inventory reports such as inventory, inventory statement
etc. should be entered into the Unit-1 field. The main follow-up
of the inventory is executed upon these reports.
For example, if the main follow-up operation of an inventory, which has transactions upon three units as quantity, package and box, will be executed upon its smallest unit, quantity, the unit definition of an inventory at an inventory card should be as follows:
Unit - 1 Quantity
Unit - 2 Package 100/1
Unit - 3 Box 50/1.
VAT rates concerning the inventories are defined in the VAT Rate % field.
| The first VAT rate defined in the SentezShop General Parameters section is displayed as default in this field. VAT rate definitions can be made in this section. |
The minimum inventory amount that should be in the warehouse is determined in the Critical Inventory Amount field. Critical amount of the inventory is entered according to the unit type defined in the Inventory Card Unit-1 field.
The optimum inventory amount that should
be in the warehouse is determined in the Optimum Inventory Amount
field. Optimum amount of the inventory is entered according to the unit
type defined in the Inventory Card Unit-1 field.
PRICE TAB
Five different prices for purchase and sales in relation to the inventories are defined in the SentezShop program. Defined prices are displayed as default inventory unit prices of all order, invoice and sales transactions of cash and credit sales operations executed in relation to the inventories.
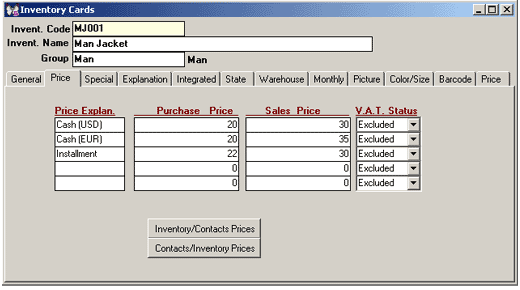
Figure 4 Inventory Card / Price Tab
Price explanation to be defined is entered into the Price Explanation field. (Wholesale, Retail, Second Quality, EUR, USD etc.)
| Price explanations defined in the SentezShop Inventory Parameters are displayed as default on the Price Explanation field. If required, changes can be executed upon the inventory card. |
Purchase price of the inventory is defined in the Purchase Price field. Purchase price defined in the first line is displayed as default unit price at all purchase operations in relation to the inventories. Inventory purchase prices that were defined in the other fields can be selected within the receipt during the transaction entries.
Sales price of the inventory is defined in the Sales Price field. Sales price defined in the first line is displayed as default unit price at all sales operations in relation to the inventories. Inventory sales prices that were defined in the other fields can be selected within the receipt during the transaction entries.
Inventory purchase and sales prices defined in this section should be assigned according to the first unit defined in the Unit - 1 field of the Inventory card general window. When operations are executed upon the other units of the inventory, the program transforms the defined default price into the 2. and 3. units automatically.
Price definitions on the basis of Current Account and Inventory can be made in this section. If Inventory/Current Account Prices button, which is on the screen, is clicked, Contacts/Inventory Based Price Table is displayed. Price definitions on the basis of the inventory are made on this screen.
Contacts/Current Account Based Price Table
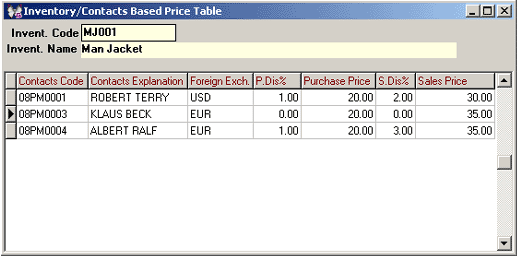 Figure 5 Inventory/Contacts Based Price Table
 Figure 5 Inventory/Contacts Based Price Table
Inventory defined in the inventory card is displayed as default on the Inventory Code field. Inventory that the price will be defined for can be selected from the Inventory Cards list displayed on the screen by either pressing the F9 key or clicking the list button.
The relevant current account, for which the inventory price to be defined will be valid, is selected from the Current Account Cards List displayed on the screen by either pressing the F9 key or clicking the List button in the Current Account Code field.
Title (Name) of the selected current account is displayed automatically on the Current Account Explanation field. Inventory prices that will be valid for the selected current accounts are entered into the Purchase Price and Sales Price fields.
If the Current Account / Inventory Prices button is clicked on the screen, Contacts/Stocks Based Price Table is displayed. Price definitions on the basis of current accounts are made on this screen.
Current
Account /Inventory Based Price Table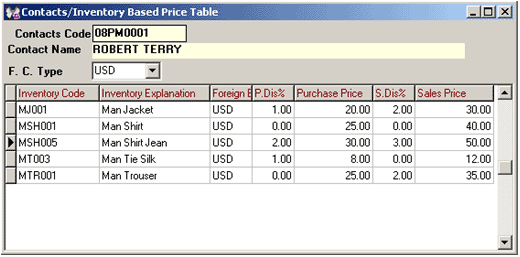 Figure 6 Current Account / Inventory
Based Price Table
Current account, for which the
price will be defined, is selected from the Current Account Cards List
displayed by either pressing the F9 key or clicking the list
button in the Current Account Code field.
The relevant inventory, prices of which will be valid for the current account, are selected from the Inventory Cards List displayed by either pressing the F9 key or clicking the list button in the Inventory Code field.
Name of the selected inventory is displayed automatically on the Inventory Explanation field. Inventory prices that will be applied to the selected current accounts are entered into the Purchase Price and Sales Price fields.
SPECIALS TAB
This is the section, where special codes in relation to the inventories are defined and entries of necessary additional information are executed.
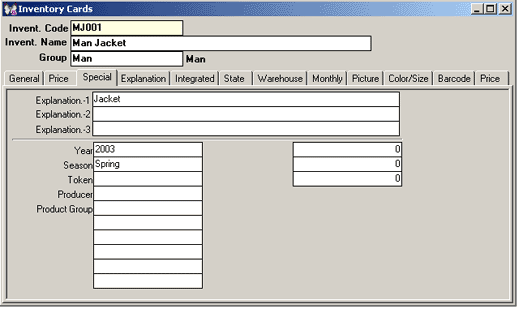
Figure 7 Inventory Card / Specials Tab
If additional information in relation to the inventory is required to enter, they are defined in the Explanation 1-2-3 fields.Furthermore, a special field, in which 10 different alphanumeric and 3 different numeric values in relation to the inventory card can be assigned, is defined (Product Type, Production Date etc.).
| Captions of the Explanation and Special Code fields are defined in the SentezShop Inventory Parameters Special Fields section. |
Listing, filtering and
cumulative or detailed statistical reporting is possible in the specials
window according to the special codes defined for the inventories. Lists
on the basis of special codes (Year, Season, Type etc.) can be displayed
on the screen by pressing the F9 key in the Special Codes field. Inventory
Card special codes can be defined as cards. If the defined special code
is not in the list, a table with a question such as Inventory Special
Code Cannot Be Found. Define Now? is displayed. If the question is
confirmed with the Yes option, a new card for the inventory card special
definitions is opened.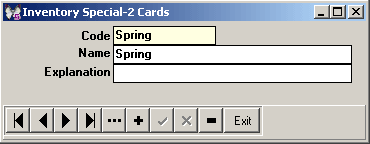
Figure 8 Inventory Special-2 Cards
EXPLANATION
TAB
Required explanation details in relation to the defined inventories are
entered into this section in detail.
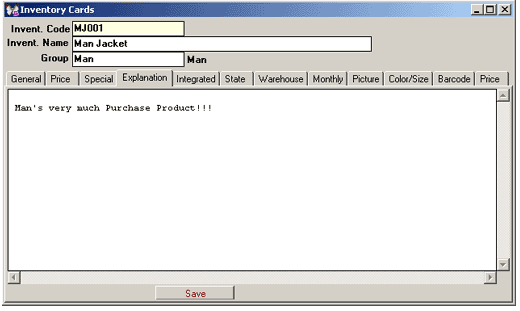
Figure 9 Inventory Card / Explanations Tab
After entering the explanation details, details
are saved by clicking on the Save button.
INTEGRATION
TAB
In order to integrate the accounting and inventory operations in the SentezShop
program, the relevant accounts that take place in the inventory card integration
window should be defined. When the invoices are integrated to the accounting,
the program receives the inventory accounting accounts from the accounts
defined in the integrated field automatically.
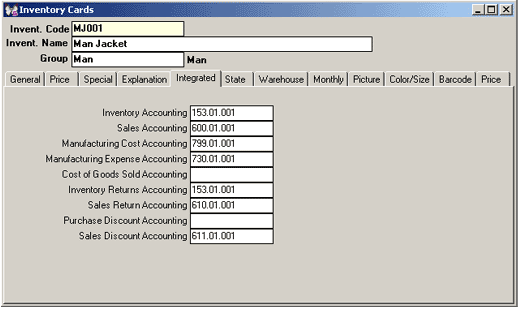
Figure 10 Inventory Card / Integration Skip
Account code that purchase operations such
as goods purchase, received consignment, purchased outside operation,
etc. will be integrated is entered into the Inventory Accounting
field.
Accounting integration code of the sales invoices such as wholesale/retail,
paid price difference, issued outside operation invoice etc. executed
for the inventory is entered into the Sales Accounting field.
Manufacturing cost account for the inventory used in manufacturing is
entered into the Manufacturing Cost Accounting field.
Manufacturing expense account for the inventory used in manufacturing
is entered into the Manufacturing Expense Accounting field.
Ledger integration code of the goods purchase return invoices of the inventory
is entered into the Inventory Returns Accounting field.
If inventory purchase returns are followed on a single account, the relevant
purchase return account is defined in the Purchase Return Account field
that take place in the SentezShop Generall
Parameters Company Card Invoice window.
Ledger integration code of the goods sales return invoices of the inventory
is entered into the Sales Return Accounting field.
Account code that the discounts will be applied in the purchase operations
is entered into the Purchase Discount Accounting field.
Account code that the discounts will be applied in the sales operations
is entered into the Sales Discount Accounting field.
| There is no need to make definitions on the inventory card integration window and the company card inventory window at the integration definitions made on the group card. All inventories of the same group are integrated to the accounts defined on the group card. |
STATUS TAB
Inventory status at the central and other warehouses, total entry/exit quantities and amounts, received/sent order amounts, actual inventory amounts concerning the relevant inventory can be followed on the inventory card status window.
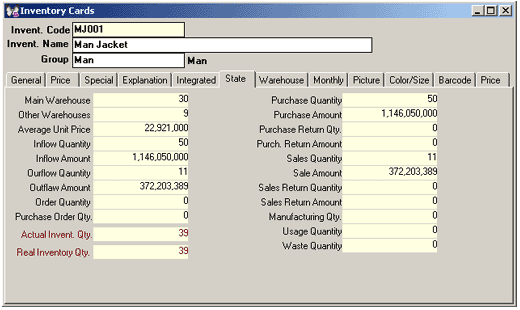
Figure 11 Inventory Card / Status Tab
Details are reflected on the inventory card status window automatically as the relevant inventory has transactions. It is based on the general transactions of the inventory. Date limitation cannot be made and these fields cannot be changed.
All quantity and amount details that take place on this window are based on the unit defined for the inventory in the Unit-1 field of the general window.
WAREHOUSE TAB
Total entry amount, total exit amount and remaining inventory status of the relevant inventory on the basis of warehouse can be followed at the inventory card warehouse window.
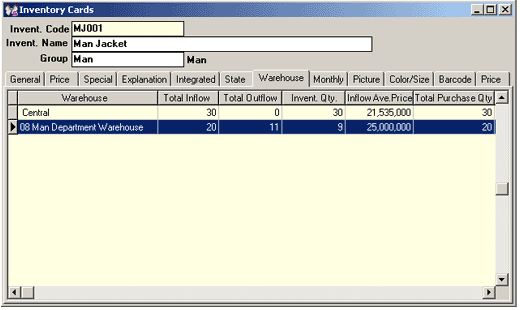
Figure 12 Inventory Card / Warehouse Tab
All quantity and amount details that take place on this window are based on the unit defined for the inventory in the Unit-1 field of the General window.
As the relevant inventory changes, the relevant information is reflected automatically into the fields on the status window. These fields cannot be changed.
MONTHLY TAB
Total purchase quantity-amount and total sales quantity-amount of the inventories on the basis of months can be followed in this section.
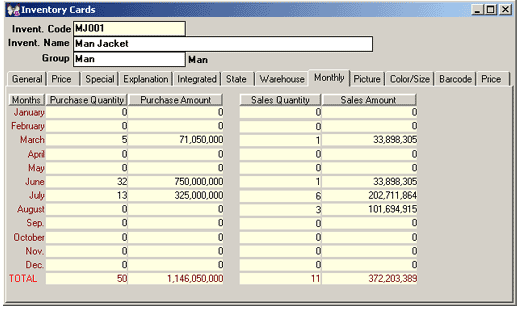
Figure 13 Inventory Card / Monthly Tab
Quantities and amounts of the monthly purchases and sales on this screen display the quantities and amounts of the relevant month only. It does not add the previous month turnovers.
As the relevant inventory changes, the relevant information is reflected automatically into the fields at the monthly window. These fields cannot be changed.
PICTURE TAB
If the picture of the introduced inventory is recorded, it can be displayed in this section.
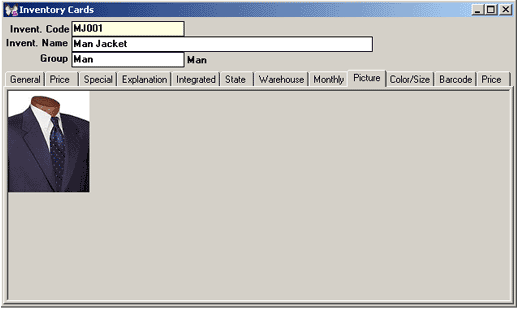
Figure 14 Inventory Card / Picture Tab
| In order the picture to be displayed on the inventory card, the picture must exist in the Picture index, which is under the SentezShop Program index. Furthermore, picture name must consist of the inventory code after S is added as prefix. |
Code of the color to be defined for the inventory can be selected among the color cards list in the Color Code field.
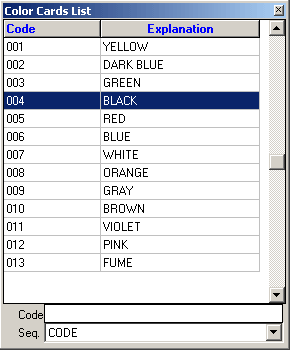
Figure 15 Color Cards Tab
Name of the color, code of which was entered,
is displayed automatically on the Color Name field.Sizes defined in the
SentezShop Set-up Program Parameters
module Inventory Parameters section is displayed as default sizes on the
Sizes section.
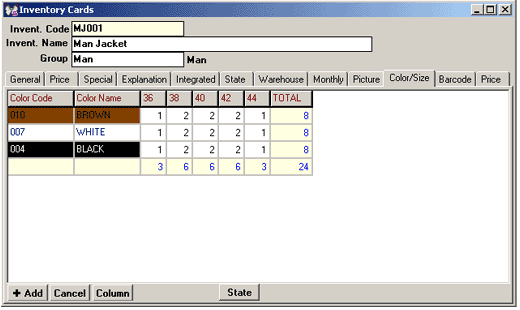
Figure
16 Inventory Card / Color-Size Tab
Size captions can be changed according to
the requirements by clicking on the Column button. Rows can be
added to enter inventory amounts according to colors by clicking sthe
Add button.
Number of the relevant sizes of the relevant colors is entered into the
size captions. After displaying the list of defined colors by selecting
the List (F9) option by right clicking the mouse, selection is executed.
Color Cards are opened by selecting the Card (Shift+F9) option. Inventory
color size lines that were entered incorrectly are deleted by clicking
the Delete button.
When
the Barcode Codes Variant (Color/Size) Based? field of the variant
skip on the Inventory parameters of the SentezShop set-up program Parameters
module is confirmed with Yes, Barcode tab is opened on the inventory card.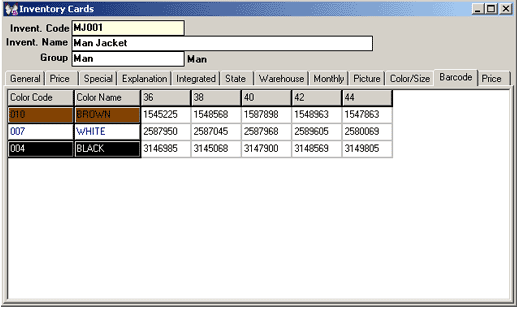 Figure 17 Inventory Cards / Barcode Tab
Accordingly, automatic barcode generation on the basis of Color/Size (ALT+B)
can be executed.
The question such as Create Barcode For Complete Set? is displayed
on the screen. It is to determine whether the barcode would be generated
for the whole table or for only the ones, of which the assortments were
defined in the color/size table.
This is the field, where prices can be defined
on the Inventory Card according to Color and Size definitions on the basis
of products.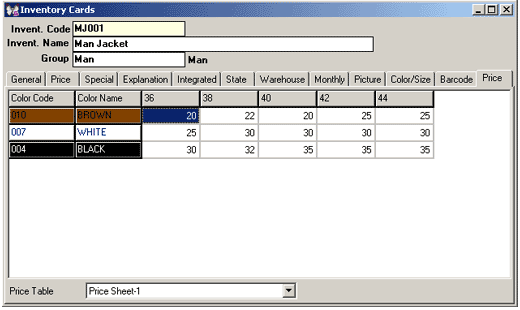 Figure 18 Inventory Cards / Price Tab
After entering the product code on the Cash Sales screen, you can make the relevant selection from the Color / Size Table. Then, display the change price screen by pressing on the F2 key. The amount entered into the inventory card price tab of the product according to the defined Color and Size is displayed. The price of the product is renewed by pressing the OK button. Thus, different prices are defined according to the colors and sizes of the same product.
For example, prices concerning the inventory no MJ001 are defined on the card as above:
Take one from the product no MJ001 in size no 40 and black color after displaying the cash sales screen. Accordingly, price of the product is the one valid on the cash sales screen (20 EURO). When Change Price screen is displayed by pressing the F2 key, the amount of the product that was defined in the inventory card is displayed (25 EURO). The information concerning the product must be entered beforehand. The new product price is confirmed by clicking the OK button. By this token, the prices defined on the inventory card according to the colors and the sizes on the basis of products can be accessed directly from the cash sales screen.
INVENTORY CARD OPERATIONS
If any changes will be made on the inventory
card, the inventory to be changed is selected from the inventory cards
list displayed by either pressing the F9 key or clicking the list button
in the Inventory Code field. After displaying the card details
on the screen, required changes are executed.
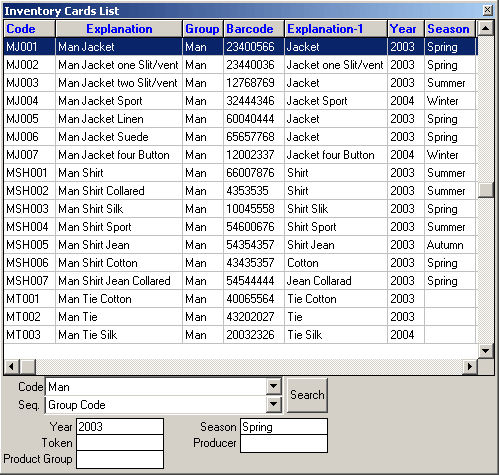
Figure 19 Inventory Card / Inventory Cards List
| Fields in the Inventory Cards List such as Year, Type, Season, Base etc. are special fields and they are optional. These field definitions can be made from the Special skip at the Inventory Card. Executed field definitions are displayed on the Inventory cards list as above. Limitations according to the information entries can be made on these fields. |
After making the required changes concerning the inventory, they are saved by either clicking on the record button or pressing on the F5 key.
INVENTORY CARD CANCELLATION
If
cancellation operation will be executed on an Inventory Card that was
defined beforehand, Inventory Card screen should be displayed first.The
inventory to be deleted is selected from the Inventory Cards List displayed
by either pressing the F9 key or clicking the list button in the Inventory
Code field. Alternatively, the inventory code can be entered directly
into this field. After displaying the details of the Inventory Card, Are
You Sure to Delete? warning is displayed by either pressing the F6
key or clicking the delete button. If Yes option is selected, the inventory
card is deleted.
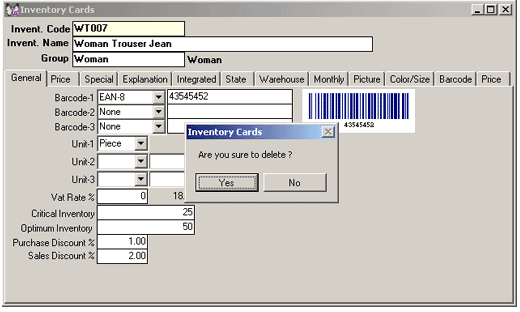
Figure 20 Inventory Card Cancellation Operation
|
Any inventory card that has transactions cannot be deleted in the SentezShop program. The inventory to be deleted must not have any transactions. |
If the code of the inventory defined in the inventory card will be changed, inventory card screen should be displayed first.
The inventory to be changed
is selected from the Inventory Cards List displayed by either pressing
the F9 key or clicking the list button in the Inventory Code field.
After displaying the details of the inventory card, the inventory code
can be changed by selecting the Inventory Code Change option from the
menu displayed by right clicking the mouse on the card.
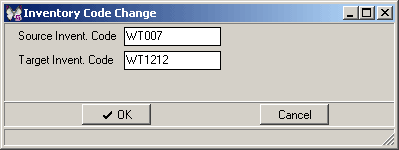
Figure 21 Inventory Card / Inventory Code Change
Inventory code is displayed automatically on the Previous Inventory
Code field.The new code of the inventory is entered into the New
Inventory Code field and OK button is clicked.
INVENTORY
CARD COPY
Information concerning the inventory
defined in the Inventory Card can be copied to a new inventory under a
different code in the SentezShop program.
In order to execute this operation, inventory
card screen should be displayed. The inventory to be copied is selected
from the Inventory Cards List displayed by either pressing the F9 key
or clicking the list button in the Inventory Code field. Alternatively,
the inventory code can be entered directly into this field. After displaying
the details concerning the inventory on the card, Inventory Code Copy
option is selected from the menu displayed by right clicking the mouse
on the card.
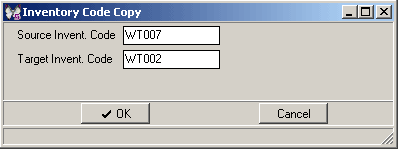
Figure 22 Inventory Card / Inventory Code Copy
Code of the inventory, which is displayed to change, appears on the screen
as default in the Previous Inventory Code field. Alternatively,
code of the inventory to be copied can be entered directly into this field.
Account code that will be assigned to the new current account to be generated
is entered into the New Account field.
DISPLAYING INVENTORY STATEMENT
Statement
of a required inventory can be displayed on the Inventory Card in the
SentezShop program.
The inventory, of which the statement will be displayed, is selected from
the Inventory Cards List displayed by either pressing the F9 key or clicking
the list button in the Inventory Code field. Alternatively, code of the
inventory can be entered directly.
Statement of the selected inventory is displayed by selecting the Statement
(Shift+F4) option from the menu displayed by either pressing the SHIFT+F4
key combination or right clicking with the mouse.
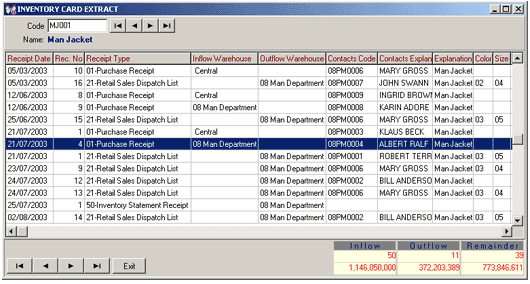
Figure 23 Inventory Card / Inventory Card Statement
Statement of a different inventory can also be displayed on the card by
entering the code of the relevant inventory into the Inventory Code.
Date
limitations cannot be made on the inventory statement displayed upon the
inventory card. All transactions of the account from the very first to
the last are followed.