Front
Office
In this module, guest activities such as Check – In, Check – Out can be
done and the occupancy rates can be followed. Front Desk is also one of
the main sections where the account information is followed, printouts
are taken and the collections and receipt operations are completed. In
this section the Check- In is done with the expected guests’ booking list
and the Check – Out is done with the departures list. The room status
is checked and the operations are seen on the Room Rack screen.
Check
– In
Walk-ins
are processed.
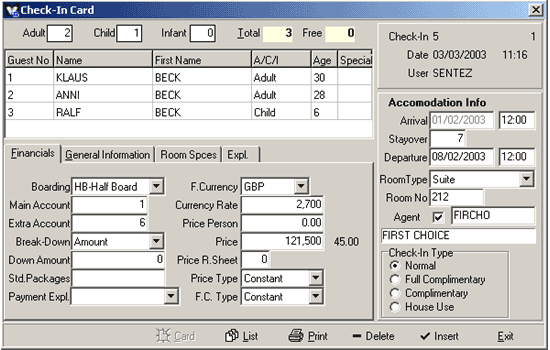
Figure 1 Check – In Card
Enter number of guests in the Number of Guests
field. Enter the number of adults in the Adult field; the number
of children in the Child field and the number of babies in the
Infant field.
Click the Card button in the
Guest No column to call The Guest Card and enter the guest information.
The information defined in the guest card is automatically transferred
to the booking room card.
If the guest card is previously defined, it can be transferred to the
check-in card by clicking the List button in the Guest No
column in the Guest Card List and selecting the related guest.Select the
related columns in A/C/I to make the Adult, Child and Infant definitions.Enter
the guest age in the Age column. If the guest is a child, this
area is used to calculate the special rates defined and registered by
the Agents for the child age groupings. A guest special code can be entered
in the Special column.
Check
– In Card Stayover Info section.
In the Arrival
field, the date and the time is entered automatically by the program.
If needed, optional changes can be made in this field.
Accommodation stayover is entered in the basis of number of days in the
Stayover field. The value entered automatically affects the Departure
Date.
The Check-out date automatically appears when the guest accommodation
stayover number of days is entered in the Departure Date column.
Clicking the Room Type column brings a list to do the room selections.
(Single Bed, etc..)
In the Room No field, the number of the room the guest will accommodate
in the hotel is typed. Whilst in the field, the List button is
clicked and the Vacant Rooms Lists where the rooms are selected
is displayed. Also in the Room No field the Card button can be
clicked to bring the Room Card to the screen and the new registrations
or changes can be done on the card.
In the Agent column the related agent is selected from the list
that is displayed by clicking the List button. If there is no Agent Card
previously defined, this is what to do: Select SentezDelux
Software / Agent Card and enter the information for the related agent
and save by either pressing the F5 key or clicking the Insert
button.
In the Check-In Type, the type of the check-in is defined according to
the Guest’s type (Normal, Complimentary, House Use, etc.)
Check – In Card
Financial Info Window
Figure 2 Check – In Card / Financial Info
In
the Boarding Type column, boarding type product selection is done.
In the Main Account column, the Account Card, which that room’s account will be followed, is opened by either pressing the F4 key or clicking the Card button. The guest info who will pay that room’s account is entered into that Account Card. This information is saved by either pressing the F5 key or clicking the Save button; pressing the ESC key or clicking the Exit button will take you back to the Check – In card. If you want to keep two different room accounts on the same Account Card, click the List button to open the Account Cards Filter and perform the necessary filtering, then select the Account with the Selection button from the Account Cards List.
In the Extras Account column, if there is a previously defined extra Account Card of a guest or an establishment, the account card list can be called to select the related account by clicking the List button, or by pressing the F4 key or clicking the Card button, a new extras account card can be opened.
In the Break-down column, the distribution type to calculate the boarding prices can be done by clicking the Selection button from the list as Amount or Percentage. In the Break-down Amount column, in the “Break-Down” section, if the distribution type is defined as “Amount” it is called as boarding amount, if it is defined as “Percentage” it is called boarding percentage.
In
the Fixed Rate Utilities column, the code numbers of the revenues
as defined in Sentez DeLux Software/ Fixed Rate Utilities Definitions
are entered. As an example, let us say that in your hotel the towel and
bathrobe fees are charged only for the first day. The towel and bathrobe
codes are entered in the Fixed Rate Utilities column. The amount written
in the Fiexed Rate Utilities column is entered into the guest’s account
with the explanation written, completing the night-audit operation.
In the F.Currency column, the selection can be made from the Currency
listing.
In the Foreign Currency Rate column the selected foreign currency
type’s rate for the related date is displayed automatically, if the currency
rates are entered on a daily basis. A different foreign currency rate
can be entered as an option. If the day’s rate is not entered, the most
recently entered foreign currency rate will appear in the column.
In the Price Per Person column, the guest’s accommodation price is written as per the foreign currency you have defined in the Foreign Currency Rate column.
In the Room Rate Table section enter the table number of the price table that have been defined in the SentezDelux Program / Agent Room Rate Tables regarding the agents’ accommodations. Click the List button to get the Agent Room Rate Table List or click the Card button to bring the Agent Room Rate Tables to the screen and define new table. In the case that Room Rate Table number is not defined, the rate is calculated by taking the agents price definition as the basis, if there is any.
In the Price Type column, it is defined whether the guest will be affected or not of the price changes during his accommodation. If the Price Type is “Constant” the boarding price does not change during the accommodation. If it is defined as Variable” the guest is affected by the price changes during the accommodation.
In the F.Currency Type column, as in the Price Type column, whether the foreign currency type is constant or variable is determined from the list. If the “Constant” is selected, the guest is not affected by the rate changes. If the “Variable” is selected, the guest is affected by the foreign currency rate changes; therefore the foreign currency rates should be entered on a daily basis.
Check
– In Card General Info Window
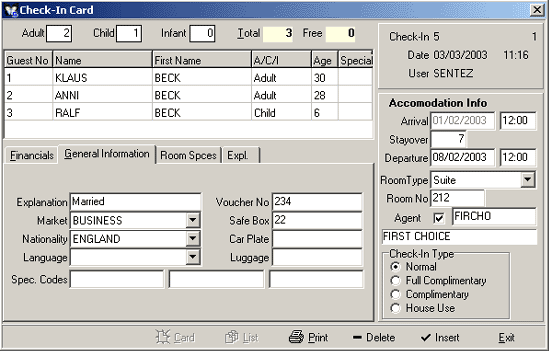
Figure 3 Check – In Card General Info
In the Explanation column, the needed info is entered.
Market column is used to define the travel type (business, tourist, etc.).
In the Nationality column, the selection is made from the alternatives. The nationality reports are prepared according to that selection.
In the Language column, if the language is defined, it is displayed automatically, or the selection is made from the alternatives.
In the Special Codes column the special code definitions for the Check-In card are entered.
In the Voucher No column the number is entered, if there is any.
In the Safe Box column, the number of the safe box rented by the Guest in the hotel is entered. In the case that the safe box number is written, a warning as “Do not forget to take the safe key back” will appear during the check - out. If the safe fee is defined in the parameters, the safe fee will be printed on the account card automatically.
In the Car Plate, Luggage
columns, the information is entered, if any.
Check
– In Card Room Specs Window
In
the Room specs section the alternative rooms are selected in accordance
with the Guest’s wishes
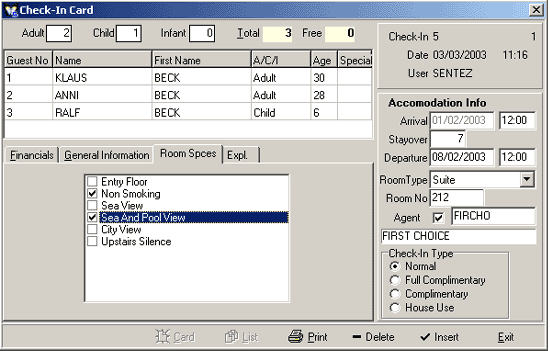
Figure
4 Check – In Card / Room Specs
Once the selections are made
from the room specs in accordance with the Guest’s preferences, whilst
in the Room No column, clicking the List button brings the
room list that matches the preferences onto the screen. Thus the room
selection according to the Room type and Room specs is realized.
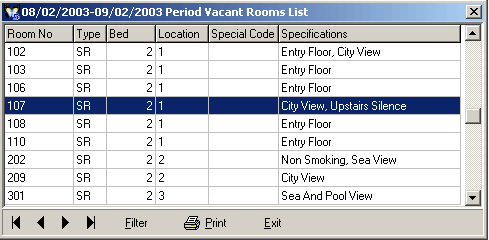
Figure 5 Check – In Card / Vacant Rooms List
For instance, if the Non – Smoking is selected,
the List button in the Room No is clicked to open the list of the
rooms that are defined in the SentezDelux
Software / Room cards section with the Non – Smoking specs. Clicking the
Selection button can also perform the room selection in accordance with
the guest’s preferences. To save the defined Check – In card, press F5
key or click the Insert button. Due to the selection of Agent,
a pop-up as “Will you open extra account card?” will appear on
the screen. Say Yes or No according to the situation.
Check – In
Change and Cancel
Over the Check
– In List right-click the mouse, or the Detail button, select Room
Info (F4). If there are changes to be done on the Check – In card
which is now on the screen, complete them and click the Insert button
to save the changes. If the Check – In is to be cancelled, click the Cancel
button or press the F6 key to delete the info. Deleting operation
can only be done on the operation date.
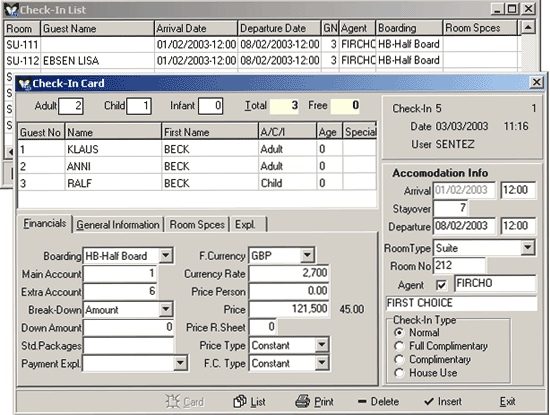
Figure 6 Check – In Card
Room
Change
When on the Check – In List
or on the Room Rack, right-clicking the mouse or clicking the Detail
button, Room Change (CTRL + R) is selected.
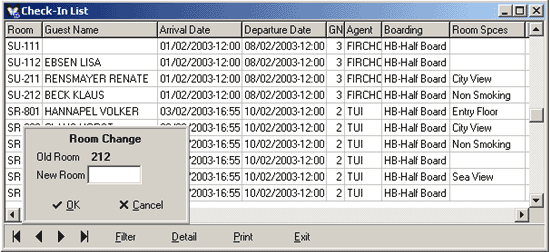
Figure 7 Room Change
In the Room Change card, the Old Room column info is “cannot be
changed”. Enter into the New Room column the room number that will
be changed. Clicking the Insert button the Room Change operation
is approved.
Check - Out
Check – Out operation
can be done by right-clicking the mouse on the Room Rack screen
or by clicking the Detail button and selecting Check-Out (F8).

Figure 8 Room Rack
Check-Out operation can also be started right-clicking
the Check-In List or selecting the Check – Out (F8) after
clicking the Detail button.
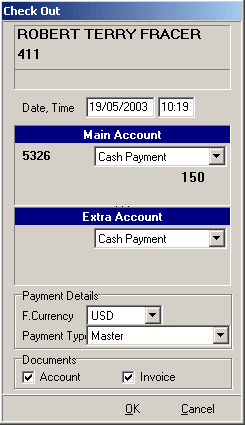
Figure 9 Check - Out
The
operation date appears automatically on the Check – Out screen.
In the Main Account and Extra Account columns the selection
window is clicked to see whether the accounts debts are to be paid cash
or credit. If the guest’s payment is to be done on foreign currency, in
the Payment Details column, the Foreign Currency and Type is selected.
The documents (Account and Invoice) that the guest wishes to receive during
Check-out are checked. The OK button is clicked for the Check –
Out operation. Reply “Yes” or “No” to “Close main account?” question.
If the Account and Invoice had been checked as the required documents,
first the Account Setup appears on the screen.
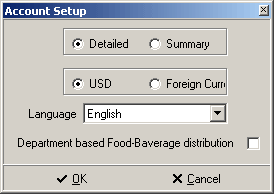
Figure 10 Account Setup
Following the Account Setup you will see the Invoice Info for the guest
who is checking out. If the guest requests an invoice, by clicking the
Print button, the print out is received.
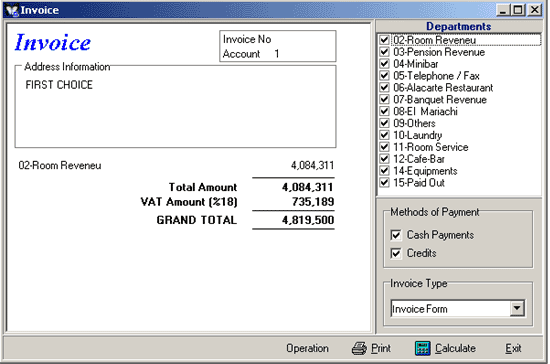
Figure 11 Invoice
Check – In List
Check
– In Filter comes to the screen once the Check – In List is selected
from the Front Office menu from which it is faster and easier to reach
the required info. (Arrival Date, Departure Date, Room type, etc.)
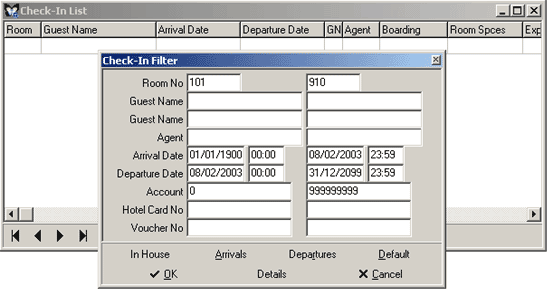
Figure 12 Check - In Filter
In the Check-In Filter, click the In House button to get the list
of the guests on the date the operation is done; click the Arrivals
button to get the list of the guest arriving on the said date; click the
Departures button the get the list of the guests departing on the
said date. The OK button is clicked to receive the Check – In List.
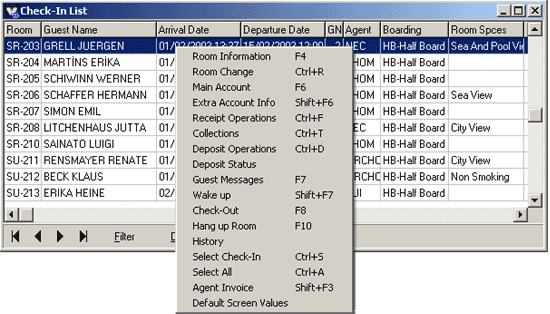
Figure 13 Check - In List
Selections can be made from the list that you will get by right-clicking
the mouse on the Check-In list, or clicking the Details button.
Room Info (F4) Required Check – In card comes to the screen.
Room Change (Ctrl + R) This is used to make room changes. Select the room that will be changed and then press the Room Change or CTRL+R keys. Write the room number in the menu and then click the OK key and the room change will be completed.
| The program will not give you the right to accommodate the guest in an occupied room. The Room Change operation will be completed when a vacant room is selected. |
Main
Account Info (F6)
Account Filter comes to the screen. Click the OK button after completing
the required filters, and get the Main Account Printout.
Extra Account Info (Shift + F6)
If there is an extra account for the guest, take the printout by selecting
the Extra Account Info or press the SHIFT+F6 keys.
Receipt Operations (Ctrl + F)
Open the related receipt card. Enter the expenses and save by clicking
the Insert button.
Collections (Ctrl + T)
Guest collection operations are done. The cash payments fall from the
account info and shows paid.
Deposit Operations (Ctrl+D) When this column is clicked the Deposit Receipt
comes to the screen. When the Deposit Status is selected, the deposit
amounts for the related account are seen.
Guest Messages (F7) Open Guest Messages List. Click the New
button and enter the messages for the Guests. The date, time and the message
are saved with the Insert button.
Wake up (Shift + F7) Open the Wake up Info window. The wake up
date and time requested by the Guest are entered by clicking the + button.
The info is saved and by clicking the Exit button you exit the
Wake up Window.
Check – Out (F8) If the Guest is leaving the hotel, Check-out operation
is started by selecting Check-Out.
Hang up Room (F10) Let’s think of a Guest staying in the hotel.
He declares that he will not stay in the hotel on Saturday and Sunday,
but will come back on Monday. You can use the Hang up Room spec for guests
like this one. Using this spec of the program, you can sell the room on
Saturday & Sunday and give it back to the old customer on Monday.
In the History column the changes done on the Check-In Card reflects
to this column and showing the values prior to the changes and gives the
info as date and time.
Select Check-in (CTRL + S)
Select Check-In is used to assemble The Main Account with the Extra Accounts.
It is also possible to assemble the whole accounts, or only the main accounts
or only the extra accounts with this selection by selecting the accounts
one by one with the mouse.
Select All (CTRL + A)
Select All is used to fast select all the rooms and to assemble
the Main Accounts with the Extra Accounts; it is also possible to assemble
all of the accounts, or only the main accounts or the extra accounts.
The accounts that will be assembled are collected under a special code,
and by means of the filter the Select All is selected and the selection
can be done rapidly.
Default Screen Values (SHIFT+F10)
The changes made on the Booking List will go back to its original status
after selecting the default screen values.
Room
Balance List (Priced)
By the means of
this list, you can the guests room prices together with the account numbers
and account balances.
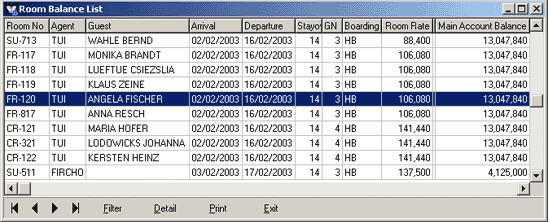
Figure 14 Room Balance List
Clicking
the Details button you can find Check – In Info(F4), Account
Operations (F6), Extra Account Operations (Shift + F6), Receipt
Operations (Ctrl + F), Collecting Operations (Ctrl + F), Check
– Out (F8) operations and do the required arrangements.