In Lot Manufacturing Information section,
manufacturing processes are tracked.
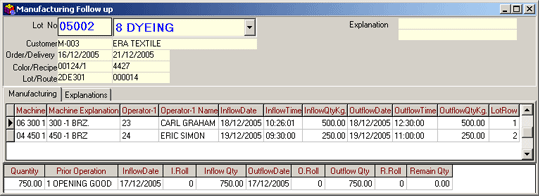 Figure 1 Manufacturing Follow-Up
Enter the related lot no in the Lot No field. With the use of that number, all header information of the related lot is displayed in the header fields on the "Manufacturing Follw-Up" screen. Processes to be applied according to the route (work flow) ; which are defined on the lot card are displayed on the manufacturing follow-up screen.
The machine code is entered in the Machine field on the Manufacturing Tab. It could be entered manually or by pressing the F9 key or using the list button it could be selected from the Machine list displayed on the screen.
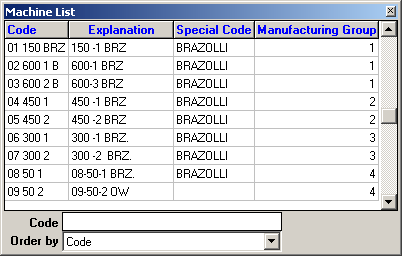
Figure 2 Machine List
The explanation entered in the Machine Cards
is displayed automatically in the Machine Explanation field.
The registration code of the employee who will be proceeding with the
process is entered in Employee-1 field. It could be entered manually
or by pressing the F9 key or using the list button it could be selected
from the Registration codes list displayed on the screen.
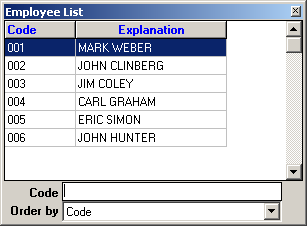
Figure 3 Registration List
Explanation entered in the registration
cards is displayed automatically according to the registration code entered
in the Employee-1 Name field.
The registration code of the employee who will be proceeding with the
process is entered in Employee-2 field. It could be entered manually
or by pressing the F9 key or using the list button it could be selected
from the Registration codes list displayed on the screen.
The explanation entered in the registration cards is displayed in the
Employee-2 field.
The planned entry date is typed in the P. E. Date field.
The planned entry hour is typed in the P. E. Hour field.
The process'entry date is typed in the Entry Date field.
The process'entry hour is typed in the Entry Hour field.
The entry (Fabric) roll quantity of the goods is typed in the Entry
Rolls field.
The entry quantity of the goods is typed in the Entry Quantity/Kg
field.
The entry width of the goods is typed in the Entry Width field.
The entry gram of the goods to processing is typed in the Entry Grams
field.
![]()
In companies where barcode manufacturing follow-up is in use, Manufacturing Information will be displayed on this form.
The planned exit date is typed in the P. Ex. Date field.
The planned exit hour is typed in the P. Ex. Hour field.
The exit date is typed in the P. Ex. Date field.
The exit hour is typed in the P. Ex. Hour field.
The exit (Fabric) roll quantity of the goods is typed in the Exit Rolls field.
The exit quantity of the goods from the process is typed in the Exit Quantity/Kg field.
The exit width of the goods is typed in the Exit Width field.
The exit grams of the goods is typed in the Exit Grams field.
The lot's row information is entered in B Row field. If that process is applied to all the lots, then this field shoud show 0.
| Manufacturing information belonging to the previous process are followed up in the section right below the manufacturing follow-up card. |
Explanation Tab: If detailed explanations will be entered for the manufacturing follow-up procedure, those are typed in this field. In order to save the explanation entered, click the Save button.
| |
Definitions of explanation fields (Manufacturing General Explanations, Manufacturing Detailed Explanations, etc) in the Explanation tab could be entered from Manufacturing (Special) tab in SentezDye Parameters. |
CANCELLATION
To cancel inventory information, move the
cursor over to the inventory to be cancelled, and click the Cancel button
or press the F6 key, and asnwer yes to "Do
you really want to delete?" message. The inventory will be
deleted.
LOSS TIME ENTRY
This is the section where loss time for machines are
defined
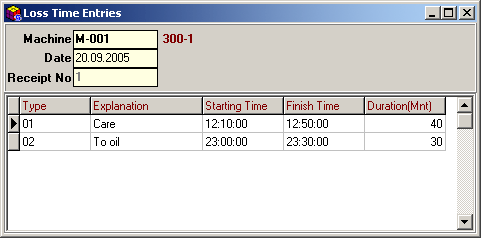
Figure 4 Loss Time Entry
Machine code to enter loss time for, is defined in
Machine field. In this field, you could select the machine code
from the Machine list that is displayed on the screen after pressing the
F9 key.
Process date is entered in the Date field.
Type of loss time code is entered in the Type field. By pressing
the F9 key, list of loss time types could be listed and chosen.
Also, while in this field, after pressing Shift+F9 keys you could access
the Loss Time Types card and define such types.
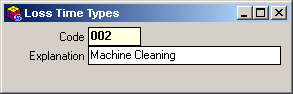
Figure 5 Loss Time Types
As the last thing, length of wasted time is defined via start and
end times. Those defined wasted time information are automatically displayed
on Manufacturing Planning and Machine Control form and Machine
Yield Report (Duration) of the Manufacturing Module.