A distinctive code is entered in the Inventory Code field, so that the inventory is followed-up within the application. The inventory code is made up of maximum 15 characters. The crucial point about the inventory code is, the code must ease the reports generated in the application. In this section if you press the F9 key or click the list button, Inventory Cards list is displayed. If the associated inventory is not in the list, then either with right-clicking and selecting the New Record (F4) or clicking the new record button, a new inventory could be created.
The defined inventory's name is entered in the Inventory Name field. If the related inventory code is selected from the inventory cards list, then the inventory name is displayed automatically.
Group field is where the fabric types (Ribana, supreme, etc) are defined.
Inventory could be collected under the selected group, thus it is possible to filter by inventory group. Also cumulative or detailed reports per each group could be generated.
| |
This definition allows the user to process a time study for each fabric group while working with the process/time table. |
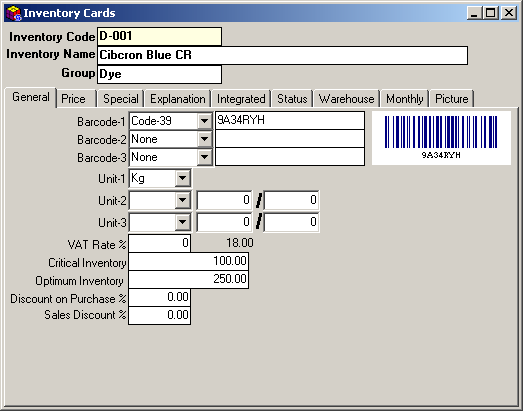
Figure 1 Inventory Cards
| |
It is possible to search defined inventory in the application according to their codes, names, groups or special codes. Therefore while defining inventory names that has common features, the naming logic should be paid attention to. |
GENERAL TAB
This is the section where general definitions such as unit, discount, VAT, barcode, etc associated with the inventory are defined.
If the manufacturing entry/exit will be processed online, then a numeric value is entered in the Barcode field. The entered barcode image is shown in the white box next to it.
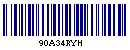 |
Figure 2 Barcode
The application uses the COD39 barcode by default. Thus, numeric and alfa-numeric value could be entered. According to the barcodes entered, barcode structure is automatically created by the application. |
The unit of the defined inventory is entered in the Unit field. In this section, there are 3 various Unit fields; (Unit-1, Unit-2, Unit-3). Inventory Follow-up is based on the record defined in the "Unit-1" field.
The second and third inventory units to process inventory activity are defined in Unit-2 and Unit-3 fields, according to unit multiplier and dividers.
There is no obligation that units should be defined in ascending or descending order.
While defining the unit for inventory in the Unit-1 field, the actual unit to be used in inventory follow-up, inventory statement, etc must be defined.
For Example, if an inventory which actually has activity in 3 different units as; Kg, meter, Gr, is primarily tracked in Kg , then "Kg" must be defined in Unit-1 field, and the rest must be defined in the other fields.
| Values in Unit field are defined in Units section of SentezDye Installation Program General Program Parameters part. |
The VAT of the inventory is entered in the VAT field.
| VAT rates in this section are defined in the VAT section on General Application parameters of SentezDye Installation Program |
Critical Inventory lists (inventory less than the minimum required) could be entered in the Critical Inventory field.
The ideal level of inventory is defined in
the Optimum Inventory field.
| Inventory supply reports could be generated based on the definitions made in the Critical and Optimum Inventory fields. |
In the Purchasing Discount field,
Purchasing discount percentage applied is entered.
In the Sales Discount field, discount applied in goods sale is
entered.
PRICE TAB
In this section 5 different purchasing and sale prices associated with
the inventory could be defined. Defined prices are used as the default
inventory unit prices for all order, invoice and shipment operations.
In the Price Explanations field, price explanations (purchasing, sales, wholesale, retail, etc) are entered.
In the Purchasing Price field, the purchasing price of the inventory is entered.
The purchasing price defined in the first row is displayed as the default purchasing unit price in all purchasing operations.
Inventory purchasing prices defined in the other fields could be selected from within the receipt while entering data.
Inventory sale price is defined in the Sale Price field.
The sale price defined in the first row is displayed as the default sale unit price in all sale operations.
Inventory sale prices defined in the other fields could be selected from within the receipt while entering data.
For prices based on foreign currency, you need to enter the foreign currency symbol defined in the foreign currency rate entry screen.
For example, if you would like to fix the 1. purchasing price of the chemical inventory you defined as USD 4.20, then you need to enter the symbol defined in dollar rate entry.
In order to use foreign currency in inventory cards, you need to set the Prices Based On Currency field, on Inventory Parameters of SentezDye Installation Program.
| These definitions are made in the special fields section on Inventory Parameters of SentezDye Installation Program parameters module. They also could be defined on the card as well. |
SPECIAL TAB
Special explanations that needs to be on the inventory card could be entered
from the special fields section. The inventory card may have up
to 10 different alfanumeric and 3 various numeric value as special fields.
(Like fabric type, manufacturing date, etc)
| These special definitions can be made in special fields tab on Inventory Card Parameters of SentezDye Installation Program Information entered in the Explanation 1 field are displayed on the recipe according to the selection made in the parameters of recipe inventory explanation field. |
| |
In group and Inventory Card Special Code fields, you could generate a list by pressing F9 key or clicking the list button and make your selection from the list displays. Also in these fields, you could make group and special code definitions by pressing Shift+F9 keys. |
EXPLANATION TAB
In this section a detailed explanation for the inventory could be entered.
The explanation entered is saved by clicking the Save
Explanation button.
INTEGRATION TAB
That is the field where integrations between associated fields are set.
Enter the accounting code in the Inventory
Accounting Account to integrate all purchasing operations for inventory
(purchasing goods, goods entry from contractor, invoices, etc)
In the Sales Accounting Account field, accounting integration
code to integrate all sales operations for inventory is entered.
In the Manufacturing Cost Account field, manufacturing cost account
for the inventory used in manufacturing is defined.
In Manufacturing Cost Account field, manufacturing cost account
for inventory used in manufacturing is defined.
In Sold Goods Cost Account field, the account that holds the cost
of the sold goods is defined.
In Purchasing Return Account field, accounting integration code
for the inventory's purchasing return invoices is entered.
In Sale Return Account field, accounting integration code for
the Inventory's sale return invoices is entered.
Two different methods could be used in assigning accounting accounts
to the inventory.
1) Separate definition of account codes from the inventory card
;
In the integrated inventory card window, definition of accounts associated
with inventory to related fields, one by one and from the cards..
Either the associated account code is directly entered in the inventory
card, or it is selected from the list displayed after F9 key is pressed
or the list button is clicked. The code is then defined.
If there is no definition in the accounting plan associated with the accounting
account, an account card can be defined, without leaving the inventory
card on the Accounting Plan window displayed after pressing the Shift+F9
keys or clicking the card button.
2) Cumulating all defined inventory in one account and integrating;
If the activity of all the inventory defined in the inventory section
will be followed up in one account in the acconting plan;
| Associated accounts are defined in the Inventory tab of Company Card section of SentezDye Parameters General module. |
In integration definition of this type, all inventory is integrated into one account. This method could be used when detailed inventory follow-up will not be made in accounting.
STATUS TAB
This is the section where inventory entry/exit operations and orders are
followed up per each warehouse and based on quantity. In this section,
inventory status, operational and actual inventory status could be previewed.
This information is displayed based on the activity processed in these
fields. Those fields cannot be intervened.
WAREHOUSE TAB
This is the section where inventory total entry, total exit and remaining
quantity values are followe up per warehouse. Information is automatically
displayed in these fields according to the activity taking place. No manuel
intervention is allowed.
MONTHLY TAB
This is the section where total purchasing (Purchasing Quantity and Price,
Amount) and sale (Sale Quantity and Price, Amount) dispersion is followed
up. Information is automatically displayed in these fields according to
the activity taking place. No manuel intervention is allowed.
PICTURE TAB
If the defined inventory has a picture recorded, that is where it is displayed.
| In order to include inventory pictures within SentezDye software, a folder named "Picture (Resim)" must be created in the folder where the application is installed. The naming is done by adding a "S" prefix to the inventory code. Then the picture is displayed in the picture field in the inventory card. |
To make a modification to an inventory, first select the inventory from the list displayed after pressing the F9 key or clicking the list button. Or the inventory code could directly be entered in the field. Necessary changes are applied once the card information is displayed.
To save the changes made, either click the save button or press F5 key.
CANCELLATION
Select the inventory to cancel in the Inventory Code field of the Inventory Cards List displayed once F9 key is pressed or the list button is clicked. Or you could enter the inventory code directly in this field. To delete inventory card information, click the cancel button or press F6 key and confirm your operation by clicking yes to "Do you really want to delete?" question. If the selected answer is YES then the inventory card is cancelled.
| No inventory card that has activity history in SentezDye application can be deleted. The inventory must not have any activity in the past, so that in could be cancelled. You could track inventory activity by generating a statement of the inventoru card. |
CHANGING INVENTORY CODE Main Menu
First move onto the inventory table you wish to make changes and right-click the mouse and select inventory code change field or press F8 key and display the table below.
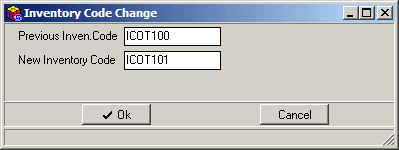
Figure 3 Changing Inventory Code
Enter the new inventory code in the Previous Inventory Code field and click OK to confirm the change. When inventory code change is applied, all information entered to the old inventory code is transferred to the new code and the old code is cancelled.
INVENTORY CODE COPY Main
Menu
Select Inventory Code Copy (Shift+F8) from the menu displayed after right-clicking
the mouse on the inventory code. The following table is displayed.
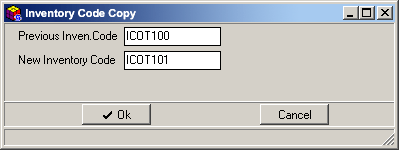
Figure 4 Inventory Code Copy
Enter the code to be duplicated in the
Previous Inventory Code field and the new code in the New Inventory
Code field. Then click OK to complete inventory code duplication
process.
INVENTORY CARD STATEMENT Main
Menu
Select the inventory to generate a statement
for by pressing the F9 key or clicking the list button and display its
inventory card. Display the statement of the Inventory by clicking the
Statement button or pressing the Shift+F4 key. In the Example;
Account statement for inventory no: ICOT103 is displayed.
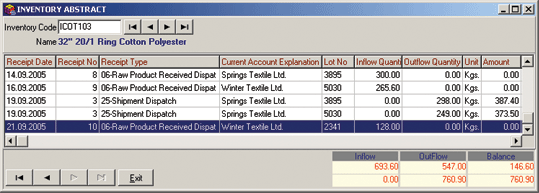
Figure 5 Inventory Card Statement
No date filtering could be applied to inventory statement generated in inventory card. All account activity from the beginning till the last one is displayed.
STATISTICAL GRAPHICS
Select Statistical Graphics (Shift+F10) from the menu displayed after
the mouse is right-clicked on the inventory card. Statictical graphics
of the set inventory could be displayed in various color options.
VARIANT QUANTITY DISPERSION
Select Variant Quantity Dispersion (Ctrl+F10) from the menu displayed
when the mouse is right-clicked when the cursor is over the Inventory
Card. Thus warehouse quantities of the ser inventory could followed up
in variants.
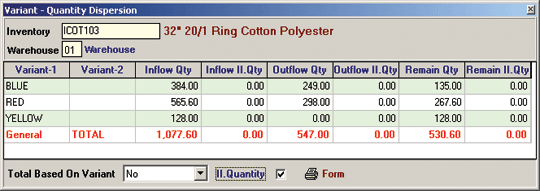
Figure 6 Variant-Quantity Dispersion
| |
To proceed with variant inventory follow-up, Variant Follow-up option in SentezDye Parameters must be selected and variant information must be entered in variant fields located in the detail section of inventory receipts (1. and 2. variant sections defined in SentezDye parameters) |