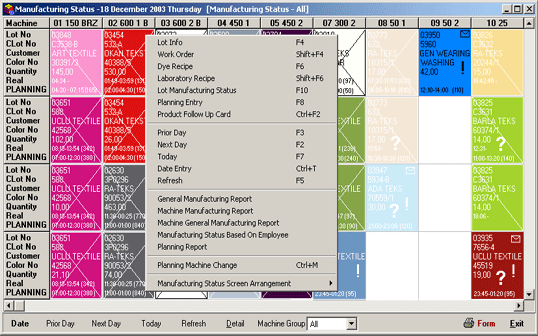
In this section manufacturing statuses per machine is followed up.

Figure 1 Manufacturing Status
Explanations regarding lot manufacturing
states are defined via colors, lines and figures on the Manufacturing
Status window. In the manufacturing status table, the detail window
will be opened if the mouse id double-clicked on the saved row.
X (Cross) sign denotes that manufacturing is finalized (completed).
\ (Back-Slash) sign denotes that manufacturing has started and
still continuoing
! (Exclamation) mark denotes that planned manufacturing completion
time is exceeded
?(Question) mark denotes that planned manufacturing start time
has passed and manufacturing has not yet started.
Envelope sign denotes that there is an important note related to
manufacturing.
 |
Figure 2 Manufacturing Date
With the Date button the manufacturing date is shown. Thus, without exiting this table, machine manufacturing states according to various dates could be previewed. |
With Previous Day[F3] button, manufacturing information of the previous day could be accessed.
With Next Day[F2] button, manufacturing information of the next day could be accessed.
With Today[F7] button, manufacturing information of the current day could be accessed.
With the use of Details button, Lot Information (F4),
Lot Work Order (Shift + F4), Dye Recipe (F6), Laboratory Recipe (Shift
+ F6), Lot manufacturing Status (F10), Planning Entry (F8), Goods Follow-up Card
(Ctrl + F2) forms could be selected from the list displayed on the screen and related processes could be initiated.
With the Refresh[F5] button information on the screen is refreshed.
With the selection from the Machine Group field, only related machine information could be previewed on the form. Machine group names are parametric (Group Types button within Machine Cards), thus the group of the machine could be defined from within machine cards.
The Form button lets the user access lists related with planning (daily - monthly manufacturing planning forms, planning lists per machine and registration)
The Exit button closes the planning form.
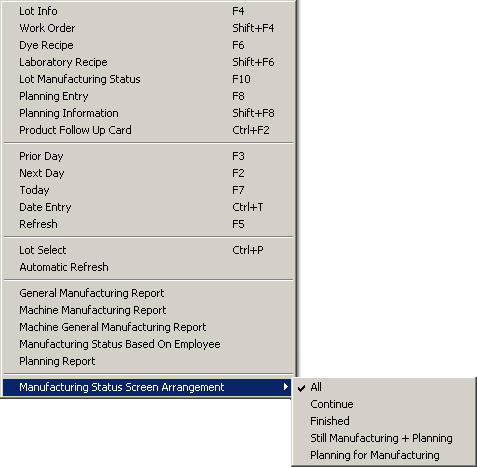
On the Manufacturing Status table (while the cursor is on the related information) right-click the mouse to display the menu:

Figure 3 Manufacturing Status / Menu
With the selection of Lot Information (F4) : information on the Work order [lot] card of the lot could be previewed.
With the selection of Lot [Work Order] (Shift+F4) field, a new Work Order card could ne opened.
With the selection of Dye Recipe field, Dye Recipe Form is displayed on the screen.
With the selection of Laboratory Recipe (Shift+F6) field, Laboratory Dye Recipe Form is displayed on the screen.
With the selection of Planning Entry (F8) field, Planning Detail From is displayed and planning entries could be processed.
With the selection of Planning Information (Shift+F8) field, Planning information is displayed on the screen.
with the selection of Lot Manufacturing
Status (F10) field, Lot Status Control Form is displayed.
 Figure 4 Lot Status Control Form
With the selection of Goods Follow-up
Card (Ctrl+F2) field, Goods Follow-up Card is displayed.
With the Selection of Planning Machine Change (Ctrl+M) field,
it displays the Change Machine window where it may allow the switch
of the machine in the planned lot.

Figure 5 Change Machine
In order to set the new machine code on this screen, you could use
the machine list that is displayed on the screen after pressing the Machine
List button..
| |
From this menu, lists showing manufacturing and planning statuses based on registration could be previewed. Also, general manufacturing reports, machine manufacturing reports, and general manufacturing reports per machine could be prepared. |
From Manufacturing Status Screen Editing section, Machine manufacturing statuses based on ongoing manufacturing, manufacturing completed, planned manufacturing could be displayed.