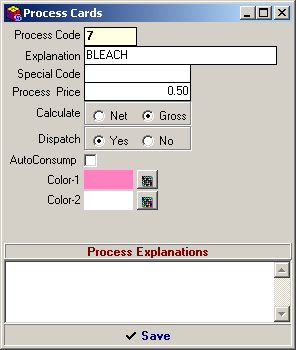
Figure 15 Operation Cards
Code number of the executed operation
is entered into the Operation Code
field. The required operation
code can be selected by displaying the operation cards list by either
pressing on the F9 key or clicking on the list button.
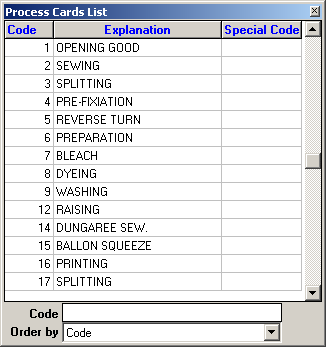
Figure
16 Operation Cards List
These
are the cards, on which Job Flows (route) are defined.

Figure
17 Job Flow Card
Job Flow Code is issued by the program automatically. However, it should be noted that the user's intervention may disable the special automatic code issuing feature Selection can be made by displaying the Job Flow Cards list by either pressing on the F9 key or clicking on the list button..
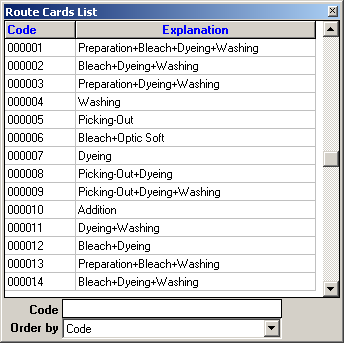
Figure
18 Job Flow Cards List
Explanations concerning the card can be entered into the Explanations field. Operations that will be included to the job flow and the M.O. (Main Operation) is selected in the operation field by either pressing on the F9 key or clicking on the list button.
If it is required to enter
an explanation into the
Explanations
field, they are
entered on the Job Flow Code field and Save the explanation button is
clicked. The operation that displays the explanations are displayed in
Blue colour
on the Job Flow Card.
In order
to delete the saved job flow cards, either press on the F6 key or click
on the Cancel button.
It is possible to make changes on the Job Flow Cards List by either pressing
on the Shift+F9 key combination or clicking on the list button.
Route Card Operation Form can be obtained by pressing on the F8 key on
the Job Flow Card.
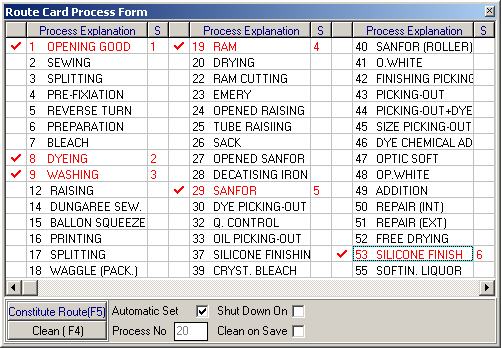
Figure
19 Route Card Operation Form
Automatic
Format : Program arranges the number of rows and columns optimally
according to the width and length of the form.
Number of Operations : If the Automatic Format option is not selected,
number of operations at a column is defined. The window is formatted by
calculating the number of columns according to this value.
Close After Saving : After completing the selection of operations
and generating the route card by clicking on the Route Generate button
(or pressing on the F5 key), the window is closed.
Clean After Saving : After completing the selection of operations
and generating the route card by clicking on the Route Generate button
(or pressing on the F5 key), the operation selections are cleaned.
After selecting the operations that will take place in the route by either pressing on the ENTER key or double clicking with the mouse on the displayed form, they can be transferred to the job flow (route) card by either clicking on the Route Generate button or pressing on the F5 key.
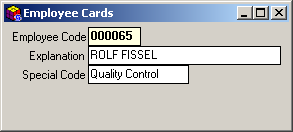
Personel definitions are
made at the Employee Cards section.
Figure
20 Employee Cards
Code number issued
for the personnel is entered into the Employee Code field. The relevant
employee details can be displayed on the screen by accessing to the Employee
List table by either pressing on the F9 key or clicking on the list button.
Name of the personnel is entered into the Explanation field. Employee
details are automatically displayed when the employee code is entered
and the ENTER button is clicked. By this token, the personnel following
any of the manufacturing stages can be followed up on the basis of codes
or names.
Code, name and capacity of
the Machinery to be defined is determined in this field.
Capacity of the machine is entered into the Capacity field. This capacity
will be reflected on the lot card automatically.
Circulation value of the machine is entered into the Circulation field.
In the Manufacturing status field, it is determined whether the machine
will be displayed on the manufacturing status window or not.
In the Manufacturing Sequence No field, the sequence of the defined machine
in the manufacturing window is determined .
Selection of the group concerning the machine is executed in the Machinery
Group field. Group names are parametric and they can be defined in the
window displayed by clicking on the Group Types button. Defined groups
are reflected on the Manufacturing Status and daily Planning and Machinery
Control Form.
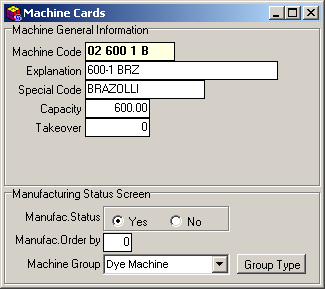
Figure 21
Machinery Cards
Machinery Cards List allows to obtain the machinery cards list defined in the machinery cards. Machinery Cards list can be accessed by either pressing on the F9 key or clicking on the list button in the Machinery Cards section.
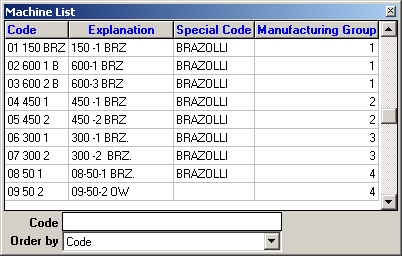
The required machine can be found by selecting Name or Code in the sequence field and entering the required code into the code field.
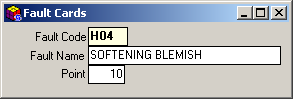
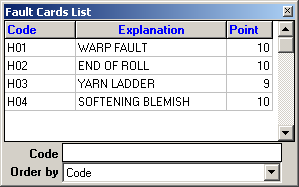
A code number is issued for the error
in the Error
Code field.
Error names occured
in the operations such as dyeing and washing are entered into the Error
Name field.
Error score that will be used in determining the quality is entered into
the Score field.
Figure
23 Error Cards
Error Cards List Error Cards List is displayed by either pressing on the F9 key or clicking on the list button in the Error Type Cards section.
Figure
24 Error Cards List
Figure
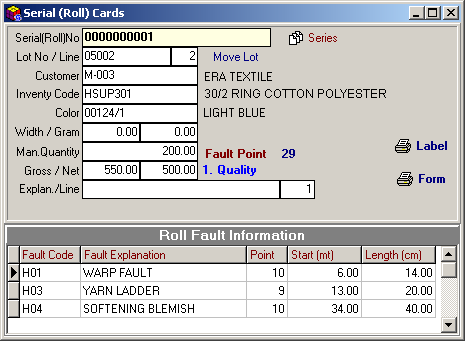
25 Series (Roll) Cards
Series
number is defined in the Series (Roll) No field.
Information of the lot (Lot number and the row number of the lot) concerning
the series is entered into the Lot No / Row field.
The relevant customer is selected in the Customer field by displaying
the Current Account Card list by either pressing on the F9 key or clicking
on the list button.
The relevant inventory is selected in the Inventory Code field by displaying
the Inventory Card list by either pressing on the F9 key or clicking on
the list button.
The relevant colour is selected in the Colour field by displaying the
Laboratory List recipe by either pressing on the F9 key or clicking on
the list button.
Width and weight of the series are entered into the Width / Weight fields.
Amount details concerning the series are entered into the Manufacturing,
Gross, Net Amount fields.
Explanations concerning the series can be
entered into the Explanations field. Sequence number of the series in
the lot is entered into the Sequence field.
Roll Error Information
The relevant error is selected in the Error Code field by displaying the
Error Card List by pressing on the F9 key or clicking on the list button.
Explanations and score details concerning the error selected in the Error
Code are reflected on the Error Explanation and Score fields automatically.
Error scores transferred to the score fields can be changed.
The metre where the error starts is entered into the Start (metre) field
and length of the error is entered into the Length (cm) field.
In the Error
Score field,
cumulative scores of the errors are displayed.
Series (Roll) Card is saved by either pressing on
the F5 key or clicking on the Save button.
By pressing on the Label button, Product Label Output with Barcode can
be obtained.
By pressing on the Form button, Roll Control Form Output with Barcode
can be obtained.
Quality values concerning the series can be defined on the Quality
Control form displayed by pressing on the CTRL+K key combination.
By
pressing on the Move Lot button, the relevant values (customer, inventory
etc.) can be moved to the form in accordance with the details entered
into the Lot No / Row fields.
Series
generation can be executed automatically from the Series
(Roll) KCard Generation Form displayed by pressing on the Serialise
button.
LOT - SERIES (ROLL) CARDS
Lot
series Form can be displayed by pressing on the CTRL+T keys on the relevant
lot row. All of the series concerning the lot row will be reflected on
this form.

Figure
26 Lot Series (Roll) Information Form
By selecting the Amount Arrangement option, it is possible to execute the amount arrangements concerning the series (roll) on the displayed window.
| In case that there is scale connection, gross amount concerning the series (Roll) are transferred from the scale automatically. Net amount is calculated by the program automatically according to the value determined in the Net-Gross difference field that is in the series control parametres. |
Lot / Series Barcode Entry : Lot information concerning the barcode (Lot Barcode and Series Barcode) that is read is transferred to the lot number and lot row fields. By this token, all series concerning the lot row are transferred on the form. Go to the Gross Amount Field : The program will automatically pass to the gross amount field after completing the selection of rows. Auto Save : In the enterprises that have scale connection, saving the operation will be executed automatically after receiving the information from the scale (in the manual applications, this happens after entering a value into the gross amount field and pressing on the ENTER button). Go to the Next Record After Saving : After executing the auto-save operation, the program will automatically pass to the next record. (In order this option to be active, Auto-Save option should be enabled).
Label Print After Auto-Save : After the completion of auto-save operation, product label output concerning the series (roll) will automatically be sent to the default printer defined in the computer. (In order this option to be active, Auto-Save option should be enabled).
Collective Barcode Label Print: Product label outputs concerning all of the series in the form can be obtained when the label button is pressed.
Sequence No Arrangement : It arranges the sequence number of the series concerning the lot row starting from 1.
In order to control the consistency of the
lot row amount and the amounts of the series (roll) concerning the lot
row, Lot - Series Amount Consistency Control option is selected from the
menu displayed by right clicking the mouse. In case that there is inconsistency
between the amounts, Lot / Series Amount Arrangement window is displayed
on the screen.
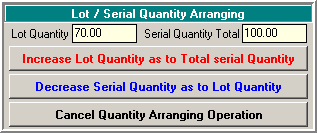
Figure 27 Lot / Series Amount
Arrangement
In order to create new Series (Roll) card
concerning the lot, ![]() Series Manufacturing window can be displayed by pressing on the ??? button.
Series Manufacturing window can be displayed by pressing on the ??? button.
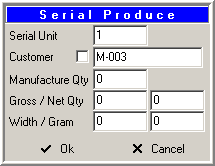
Figure 28 Series Generation
This is where the standard periods of operations
are determined.
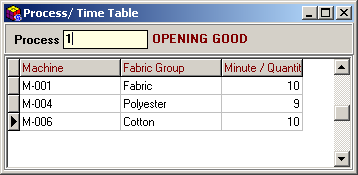
Figure 29 Operation /
Time Table
It is determined for how much time the operation will be applied in the
Operation
field according to the operation concerning the machinery. Code of the
operation to be applied can either be entered manually or be selected
by either pressing on the F9 key or clicking on the list button.
The machinery that will be subject to operations are selected in the Machinery
field.
Fabric / Dye Group field varies with respect to the operation (This field
turns into Dye Group for dyeing operations)
Unit manufacturing time of the relevant machine is entered into the Minute
/ Amount.
For example, operation time of 1 unit (kg., metre etc.) inventory concerning
the KASKORSE group is 12 minutes at the machine number 06 300 1.
Executed operations are saved by either pressing on the F5 key or clicking
on the save button.
Date and hour of the planning output will be calculated automatically
in accordance with the periods determined in this field.
This is where the standard periods of machines
on the basis of manufacturing groups are determined.
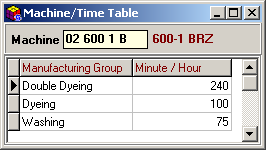
Figure 30 Machine / Time
Table
Machine code can either be entered manually or selected by pressing on
the F9 key or clicking on the list button in the Machine
field.
The relevant manufacturing group can be selected from the window desiplayed
in the Manufacturing Group field. The manufacturing groups can be defined
in the Manufacturing and Planning Tab of the SentezDye Paramtres.
Manufacturing amount of the relevant machine for 1 hour is entered into
the Amount / Hour field.
For example, manufacturing of the machine number 25-1 of the dyeing manufacturing
group for 1 hour is displayed as 100 units (metres, kgs etc.)
Executed operations are saved by either pressing on the F5 key or clicking
on the save button.
Date and hour of the planning output will be calculated automatically
in accordance with the periods determined in this field.
LOSS TIME TYPE CARDS Main Menu
This is where the loss time types are defined.
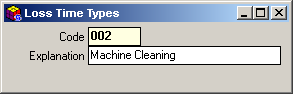
Figure 31 Loss Time Types
Code of the loss time is defined in the Code
field. Loss time code can either be entered
manually or selected by pressing on the F9 key or clicking on the list
button.
Name of the loss time is defined in the Explanation
field.
Executed operations are saved by either pressing on the F5 key or clicking
on the save button.
Loss time types defined in this field will be used in the loss time entry
forms.
This is where the variants
are defined to be used in the follow-up of the inventories with variant.

Figure
32 Variant Cards
Variant code is defined in the Variant
Code field. Variant code can either
be entered manually or selected by pressing on the F9 key or clicking
on the list button.
Name of the variant is defined in the Variant Name field.
Explanations concerning the variant are entered into the Explanation field.
Executed operations are saved by either pressing on the F5 key or clicking
on the save button.
Variant cards defined in this field are used in the inventory receipts
and thus inventories with variant can be followed up.